概述
通过第一部分和第二部分我们已经将模版通过声明式进行了自动化管理,如果你希望让Packer自动执行模版更新,可以定义一个计划任务,每天执行一次,这样每天都有最新的模版,非常酷。为了模版我们开始着手解决虚拟机批量部署的难题,这里我们选用了最流量的基础架构即代码(IaC)工具-Terraform,用来执行虚拟机的自动化部署和声明式管理,为了尽量接近生产环境使用,我做了一些实用的定制工作,供大家参考。
- 同时部署多台虚拟机;
- 自定义虚拟机备注(应用名称、负责人、创建时间等);
- 自定义虚拟机标签;
- 自定义虚拟机文件夹和资源池;
- 获取中国标准时间(+08:00);
提示,由于Packer示例中,模版名是以日期作为后缀的,所以每天只会产生一个模版,同时如果做计划任务,每天都会有一个模版,要注意清理,避免过度占用磁盘空间。
什么是Terraform ?
Terraform 是最流行的基础架构即代码(IaC)工具,用于安全的构建、修改和版本化管理基础设施,其采用声明式进行管理,并会基于代码变化对基础设施进行变更,在自动化是时代非常有价值。
很多时候,企业中的基础设施是非常多样化的,包含不同厂家、不同产品、不同接口,要想实现整套环境的编排,非常难;得益于Terraform良好的生态,其提供非常完整的适配,例如:
以下列出的仅仅是官方的Providers,还有社区维护的Providers。
- vSphere/NSX/vCloud Dirctor/vRA/OpenStack
- AWS/GCP/Azure/Aliyun/
- F5/A10/VMware AVI
- Kuberentes/Docker/
- Gtilab/Github
- MySQL/PostgreSQL/RabbitMQ/
- ……
官方Providers列表→ https://www.terraform.io/docs/providers/index.html社区Providers列表→ https://www.terraform.io/docs/providers/type/community-index.html
相关工具:
Terraform是一个开源的基础架构即代码(IaC)工具,支持非常的基础架构设备。
https://www.terraform.io/downloads.html
vSphere是VMware企业级虚拟化软件,被企业客户广泛使用,具备稳定性高、性能好、安全性高和易使用的特点。
https://www.vmware.com/cn/products/vsphere.html
相关代码中包含Terraform所需的文件。
https://github.com/6547709/terrafrom-vsphere/tree/master/base
VMware虚拟机硬件版本中详细列出了vSphere对虚拟机硬件版本的支持
使用时请根据实际环境进行修改
环境需求:
- 一台Windows/Linux/Mac电脑,能够连接vCenter Server;
- Terraform程序:https://www.terraform.io/downloads.html
安装Terraform
Terraform采用GO语言编写,安装非常简单,只需要将terraform二进制文件拷贝到bin目录即可。
wget https://releases.hashicorp.com/terraform/0.12.20/terraform_0.12.20_linux_amd64.zip
unzip terraform_0.12.20_linux_amd64.zip
cp terraform /usr/local/bin/
chmod +x /usr/local/bin/terraform
export PATH=/usr/local/bin:$PATH
terraform version
准备Terraform工作目录
Terraform是基于目录的,所以必须为每个计划创建一个独立的工作目录,实际上工作目录管理是后期使用很重要的一点,包括公用module等,请大家通过官网进行学习。
cd ~
mkdir terraform-vsphere
cd terraform-vsphere
Terraform 执行命令时会读取工作目录中所有的 .tf, .tfvars 文件,所以我们不必把所有的东西都写在单个文件中去,应按职责分列在不同的文件中,例如:
| 文件名 | 说明 |
|---|---|
| provider.tf | provider配置 |
| terraform.tfvars | 配置provider要用的变量 |
| varable.tf | 通用变量 |
| resource.tf | 资源定义 |
| data.tf | 包文件定义 |
| output.tf | 输出 |
Terraform vSphere配置参考:https://www.terraform.io/docs/providers/vsphere/index.html
Terraform声明式语言(HCL)简介
它是云基础架构自动化工具hashicorp实现的配置语言, 它吸收了JSON与YAML及一些脚本语言的特性,自身兼容JSON语法:
- 单行注释以#或开头//
- 多行注释包含在/和中/。不允许嵌套块注释。多行注释(也称为块注释)在第一个*/找到时终止。
- 属性值设置用key = value(空格忽略)表示。value可以是字符串,数字,布尔值,对象或列表。
- 字符串必须用双引号,可以包含任何UTF-8字符。例:"Hello, World"
- 多行字符串从一行<<EOF的末尾开始,并EOF结束。可以使用任何文本代替EOF。
准备variables.tf文件
variables.tf文件用于定义变量名称和类型,这是必须的,如果您希望使用新的变量或者修改变量类型,请在对应修改variables.tf文件。
变量可以通过default定义默认值,可以减少我们变量的赋值工作。
#===========================#
# VMware vCenter connection #
#===========================#

variable "vsphere-user" {
  type        = string
  description = "VMware vSphere user name"
}

variable "vsphere-password" {
  type        = string
  description = "VMware vSphere password"
}

variable "vsphere-vcenter" {
  type        = string
  description = "VMWare vCenter server FQDN / IP"
}

variable "vsphere-unverified-ssl" {
  type        = string
  description = "Is the VMware vCenter using a self signed certificate (true/false)"
}

variable "vsphere-datacenter" {
  type        = string
  description = "VMWare vSphere datacenter"
}

variable "vsphere-cluster" {
  type        = string
  description = "VMWare vSphere cluster"
  default     = ""
}

variable "vsphere-template-folder" {
  type        = string
  description = "Template folder"
  default = "Templates"
}

#================================#
# VMware vSphere virtual machine #
#================================#

variable "vm-count" {
  type        = string
  description = "Number of VM"
  default     =  1
}

variable "vm-name-prefix" {
  type        = string
  description = "Name of VM prefix"
  default     =  "tftest"
}

variable "vm-datastore" {
  type        = string
  description = "Datastore used for the vSphere virtual machines"
}

variable "vm-network" {
  type        = string
  description = "Network used for the vSphere virtual machines"
}

variable "vm-linked-clone" {
  type        = string
  description = "Use linked clone to create the vSphere virtual machine from the template (true/false). If you would like to use the linked clone feature, your template need to have one and only one snapshot"
  default     = "false"
}

variable "vm-cpu" {
  type        = string
  description = "Number of vCPU for the vSphere virtual machines"
  default     = "2"
}

variable "vm-ram" {
  type        = string
  description = "Amount of RAM for the vSphere virtual machines (example: 2048)"
}

variable "vm-disk-size" {
  type        = string
  description = "Amount of Disk for the vSphere virtual machines (example: 80)"
  default     = "80"
}

variable "vm-name" {
  type        = string
  description = "The name of the vSphere virtual machines and the hostname of the machine"
}

variable "vm-guest-id" {
  type        = string
  description = "The ID of virtual machines operating system"
}

variable "vm-template-name" {
  type        = string
  description = "The template to clone to create the VM"
}

variable "vm-domain" {
  type        = string
  description = "Linux virtual machine domain name for the machine. This, along with host_name, make up the FQDN of the virtual machine"
  default     = ""
}

variable "vm-folder" {
  type        = string
  description = "The VM folder"
}

variable "vm-resource-pool" {
  type        = string
  description = "The VM resource pool"
}

variable "vm-tag-category" {
  type        = string
  description = "The category for tags"
}

variable "vm-tag-list" {
  type        = list(string)
  description = "The VM tags"
}

variable "vm-annotation" {
  type        = string
  description = "The VM notes"
}

variable "vm-application" {
  type        = string
  description = "The VM Custom Attributes"
}

variable "vm-owner" {
  type        = string
  description = "The VM Custom Attributes"
}
准备terraform.tfvars文件
terraform.tfvars文件用于变量赋值,例如:vCenter地址、口令、虚拟机配置等。
如果不希望存储机密信息在文件中,您可以通过远程数据源获取,例如:Consul 推荐下载源码,避免粘贴代理字符等问题
- 第5行,定义虚拟机数量,多个虚拟机会在名称后增加-1、-2的货后缀
- 第6行,定义虚拟机基础名称
- 第7行,定义虚拟机模版名称,如果模版保存在文件夹中,请在55行修改模版文件集
- 第8行,定义虚拟机模版所在的文件夹
- 第9-10行,定义虚拟机硬件配置
- 第13-14行,定义虚拟机部署到哪个资源池和文件夹,文件夹需要提前创建
- 第15-16行,定义虚拟机目标数据中心和集群
- 第17行,定于虚拟机使用存储
- 第18行,定义虚拟机使用网络
- 第19行,定义Linux虚拟机的domain
- 第21行,定义虚拟机备注消息的第一行内容,其他行会在32-33行定义
- 第26-27行,定义要为虚拟机分配哪些tag,tag需要提前创建
- 第41-50行,定义vCenter连接信息
# ======================== #
# VMware VMs configuration #
# ======================== #

vm-count = "2"
vm-name = "tftest"
vm-template-name = "CentOS7-T-2020-02-16"
vsphere-template-folder = "Templates"
vm-cpu = 2
vm-ram = 4096
vm-disk-size = 80
vm-guest-id = "centos7_64Guest"
vm-resource-pool = "Terraform"
vm-folder = "Terraform"
vsphere-datacenter = "Labs-DC02"
vsphere-cluster = "DC02-Cluster"
vm-datastore = "SSD_DATASTORE"
vm-network = "vlan100"
vm-domain = "corp.local"

vm-annotation = "Create by Terraform"

# ============================ #
# vm tags and category         #
# ============================ #
vm-tag-category = "terraform-test-category"
vm-tag-list = ["web-443", "web-80"]

# ============================ #
# VM Custom Notes              #
# ============================ #
vm-application = "WebServer"
vm-owner = "Terraform-user"

# ============================ #
# VMware vSphere configuration #
# ============================ #

# VMware vCenter IP/FQDN
vsphere-vcenter = "vcenter.corp.local"

# VMware vSphere username used to deploy the infrastructure
vsphere-user = "[email protected]"

# VMware vSphere password used to deploy the infrastructure
vsphere-password = "VMware1!"

# Skip the verification of the vCenter SSL certificate (true/false)
vsphere-unverified-ssl = "true"
准备main.tf文件
main.tf文件用于执行编排工作,其中provide代表你要编排的目标平台,data用于查询对象,并在resource中使用,locals是本地变量,用于数据处理,resource用于声明资源,terraform会基于此声明对比环境中是否一致,如果不一致terraform将修复到一致状态。
- 第6-49行,定义provide是VMware vSphere,并从terraform.tfvars中读取配置
- 第54-65行,由于我们要同时为虚拟机添加多个Tag,所以需要使用for_each和for进行处理,并通过local.tags保存为list,以供resource阶段使用
- 第71-73行,处理默认时区问题,格式化为CST时间
- 第83行,定义虚拟机备注显示的内容,其中“\n”是换行符
- 第96-101行,定义Linux自定义配置,这里采用DHCP和简单配置,可以参考文档进行自定义静态IP地址等
提示,由于生产环境涉及自定义的配置还很多,所以请根据实际需求进行调整
# ==================== #
# Deploying vSphere VM #
# ==================== #

# Connect to VMware vSphere vCenter
provider "vsphere" {
  user           = var.vsphere-user
  password       = var.vsphere-password
  vsphere_server = var.vsphere-vcenter

  # If you have a self-signed cert
  allow_unverified_ssl = var.vsphere-unverified-ssl
}

# Define VMware vSphere
data "vsphere_datacenter" "dc" {
  name = var.vsphere-datacenter
}

data "vsphere_datastore" "datastore" {
  name          = var.vm-datastore
  datacenter_id = data.vsphere_datacenter.dc.id
}

data "vsphere_compute_cluster" "cluster" {
  name          = var.vsphere-cluster
  datacenter_id = data.vsphere_datacenter.dc.id
}

data "vsphere_network" "network" {
  name          = var.vm-network
  datacenter_id = data.vsphere_datacenter.dc.id
}

data "vsphere_virtual_machine" "template" {
  name          = "/${var.vsphere-datacenter}/vm/${var.vsphere-template-folder}/${var.vm-template-name}"
  datacenter_id = data.vsphere_datacenter.dc.id
}

data "vsphere_resource_pool" "resource_pool" {
  name        = var.vm-resource-pool
  datacenter_id = "${data.vsphere_datacenter.dc.id}"
}

data "vsphere_tag_category" "category" {
  name        = var.vm-tag-category
}

# ==================== #
# Get tag id from vars #
# ==================== #
data "vsphere_tag" "tag" {
  for_each    = toset(var.vm-tag-list)
  name        = each.value
  category_id = "${data.vsphere_tag_category.category.id}"
}

locals {
  tags = [
    for tag-id in data.vsphere_tag.tag :
      tag-id.id
    ]
}

# =================== #
# get CST Time.       #
# =================== #

locals {
   time = "${formatdate("YYYY-MM-DD hh:mm",timeadd(timestamp(),"8h"))}"
}

# Create VMs
resource "vsphere_virtual_machine" "vm" {
  count = var.vm-count
  name             = "${var.vm-name}-${count.index + 1}"
  resource_pool_id = data.vsphere_resource_pool.resource_pool.id
  datastore_id     = data.vsphere_datastore.datastore.id
  folder           = var.vm-folder
  tags             = local.tags
  annotation       = "${var.vm-annotation}\nVM-Application:${var.vm-application}\nVM-Owner:${var.vm-owner}\nVM-CreateDate:${local.time}"
  num_cpus = var.vm-cpu
  memory   = var.vm-ram
  guest_id = var.vm-guest-id
  network_interface {
    network_id = data.vsphere_network.network.id
  }
  disk {
    label = "${var.vm-name}-${count.index + 1}-disk"
    size  = var.vm-disk-size
  }
  clone {
    template_uuid = data.vsphere_virtual_machine.template.id
    customize {
      timeout = 0
      linux_options {
        host_name = "${var.vm-name}-${count.index + 1}"
        domain    = var.vm-domain
      }
      network_interface {}
    }
  }
}
# limit the terraform version
terraform {
  required_version = ">= 0.12.20"
}
Terraform初始化工作目录
在准备好Terraform定义文件后,terraform的plan/apply命令都是不可用的,我们需要先进行初始化,初始化时terraform会在当前目录下创建.terrafrom目录,并下载相应插件到此目录(需要联网下载,离线安装请参考官方文档)
terraform init
Terraform预执行计划
在初始化完成后,我们通过plan命令执行预计划,让我们清晰的了解要做什么行动
- 创建:将创建带有加号(+)的资源(绿色)
- 更新:带波浪号(〜)的资源将被修改(琥珀色)
- 删除:带负号(-)的资源将被删除(红色)
提示,资源变更后的执行动作(更改、删除)取决于provider的定义,请查看相应provider文档
terraform plan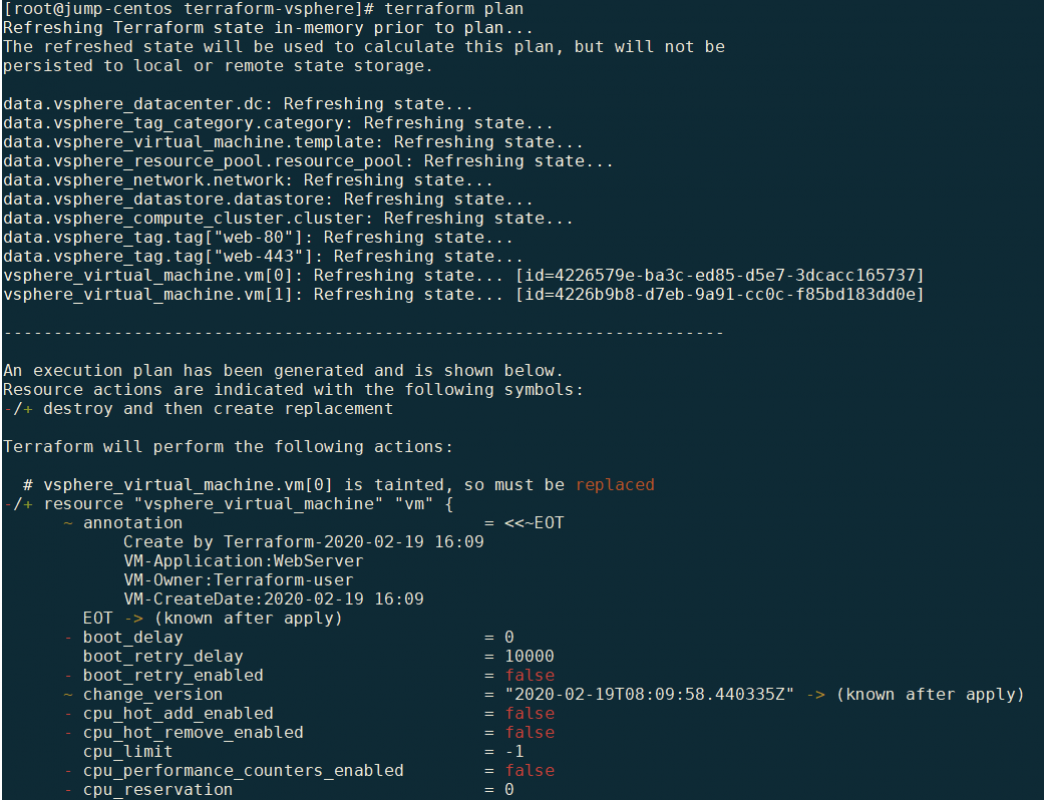
Terraform执行
确定要进行的操作后,通过apply命令执行计划,执行计划会对环境进行验证,并要求输入“yes”才能真正执行。
terraform apply如果希望自动批准可以增加-auto-approve参数
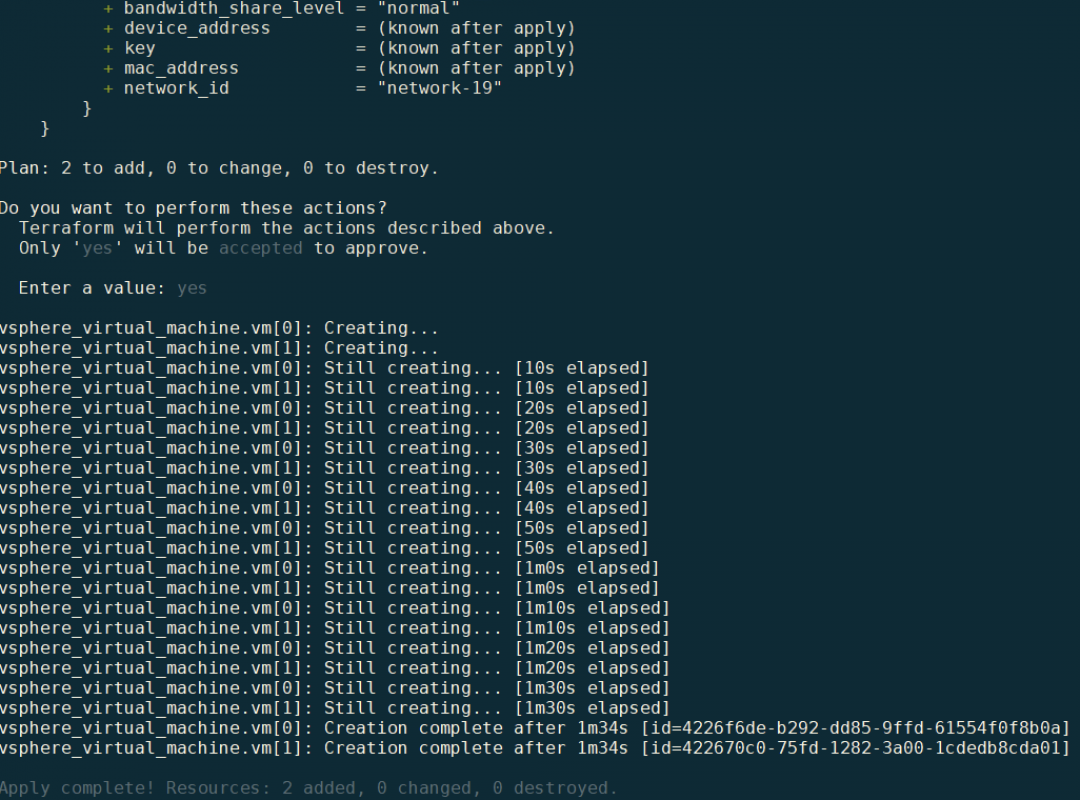
验证执行结果
通过最后的时间可以看到,两台虚拟机用时1分34秒完成部署,效率非常高,而且无需手工操作。


查看Terraform中的状态文件
terraform.tfstate文件会保存执行后的状态信息,当执行apply操作后,此文件会被自动创建,它是一个标准的JSON文件,这个文件对terraform来说非常重要,它会影响terraform plan的决策,但不会影响terraform的最终执行效果,这是因为虽然在执行plan是没有tfstate文件,会提示添加,但是当terraform连接到vSphere环境时发现已经存在,那么他就不会在vSphere中执行添加。
terraform.tfstate文件不应该保存在本地,应该保存在远程目录,这样可以保证其持久性,一般会保存在S3或Consul中,可以去查看官方支持的backend https://www.terraform.io/docs/backends/types/index.html
测试删除一个tag声明
- 编辑terraform.tfvars文件
- 删除第27行中,web-443标签
vm-tag-list = ["web-80"] - 执行terraform apply命令进行资源变更
terrafrom apply -auto-approve - 查看执行结果


从上面的结果可以看出,当我们变更配置后,terraform apply会对vSphere的资源进行变更,这就是声明式的特点。
大家可能会发现,为什么我不是通过Terraform创建新的Tag,而是需要预先创建Tag呢?这是因为如果我使用Terraform创建Tag,当使用Terraform销毁资源时这个Tag也会被删除,如果其他虚拟机使用了这个Tag,也将失效,所以我们要基于场景和情况来使用Terraform。
测试销毁资源
销毁已创建的资源非常简单,只需要destroy命令即可销毁所有terraform创建的资源
terraform destory -auto-approve
销毁资源后,Terraform会清空terraform.tfstate文件并生成terraform.tfstate.backup文件,.backup文件保留上一次的备份,可以用与还原。
完成
至此我们通过Terraform实现了vSphere环境下的虚拟机的自动部署和声明式管理,如果希望管理其他基础设施可以参考官方文档。下一章我会带来通过Gitlab CI/CD实现虚拟机的声明式管理。
重要、重要、重要::
如果你选择使用Terraform管理基础设施,为保证状态的一致性,请不要在Terraform之外修改基础架构配置,应该仅保持在一个位置变更,否则再次执行Terraform会让你的修改回退到Terraform声明的状态。
当然,如果您仅仅是为了快速、一次性的创建资源,也是可以的,要注意删除已有的状态文件,并变更虚拟机名字,例如再次使用本示例的代码创建虚拟机时,一定要删除terraform.tfstate文件,修改虚拟机名字。
很多时候我们不仅仅是需要部署虚拟机,还需要在虚拟机中增加配置文件、部署应用,我做了另一个示例供参考:https://github.com/6547709/terrafrom-vsphere/tree/master/centos-remote-exec
如果您希望继续深入学习,可以通过Terraform的Registry查看/使用其他人做好的示例:https://registry.terraform.io/
本系列一共分为四部分:
一、使用Packer自动化构建vSphere虚拟机模版——CentOS 7.x
https://www.guoqiangli.com/2020/02/16/template-automation-series-1-use-packer-automation-to-build/
二、使用Packer自动化构建vSphere虚拟机模版——Windows Server 2016
https://www.guoqiangli.com/2020/02/16/template-automation-series-2-use-packer-automation-to-build/
三、使用Terraform结合Packer批量部署虚拟机
四、使用GitLab CI/CD实现虚拟机声明式管理