 在企业运维管理中,管理IP地址通常是一项挑战,有的采用Excel管理、有的用在线共享文档管理,这两个管理方式都在解决2个问题:1)记录IP地址信息;2)多人协作;今天介绍如何安装和使用开源的IP地址管理工具—“phpIPAM”,并在文章内详解介绍部署过程。
phpIPAM概述
phpIPAM是一个开源 Web IP 地址管理应用程序 (IPAM)。其目标是提供轻便、现代且有用的 IP 地址管理。它是基于 php 的应用程序,具有 MySQL 数据库后端,使用 jQuery 库、ajax 和 HTML5/CSS3 功能,其功能清单如下:
- IPv4/IPv6 IP 地址管理;
- 部分/子网管理,VLAN管理、VRF管理;
- 自动显示子网的可用空间;
- 可视化子网展示;
- 自动子网扫描/IP状态检查;
- PowerDNS 集成;
- 网络地址转换支持;
- 机架管理;
- 域认证(AD、LDAP、Radius);
- 设备/设备类型管理;
- IP请求模块;
- IPv4/IPv6计算器;
- 自定义字段支持;
- REST Api;
服务器规划
| 服务器名称 | IP地址 | 硬件配置 | 用途 |
|---|---|---|---|
| mgmt-ipam | 192.168.10.100 | 2C/4G/80G | PHPIPAM |
环境及软件版本信息
| 软件名称 | 版本 | 备注 |
|---|---|---|
| Rocky Linux | 8.8 | |
| Nginx | 1.22.x | |
| PHP | 7.4.x | |
| phpIPAM | 1.5.x | |
| mySQL | 8.0.x |
安装基础环境软件
首先,修改系统默认的Nginx和php版本。
sudo dnf module switch-to php:7.4 nginx:1.22再安装所需的软件环境。
sudo dnf install -y mysql-server nginx php-fpm php-cli php-gd php-common php-ldap php-pdo php-pear php-snmp php-xml php-mbstring php-gmp php-json php-mysqlnd gitMySQL数据库部署
设置MySQL自启动和启动服务,完成MySQL数据库的初始化工作。
sudo systemctl enable --now mysqld对MySQL数据库进行初始化,并配置root密码。
sudo mysql_secure_installationSecuring the MySQL server deployment.
Connecting to MySQL using a blank password.
#建立密码验证插件,选择“y”
VALIDATE PASSWORD COMPONENT can be used to test passwords
and improve security. It checks the strength of password
and allows the users to set only those passwords which are
secure enough. Would you like to setup VALIDATE PASSWORD component?
Press y|Y for Yes, any other key for No: y
#选择密码规则,选择“0”,密码大于等于8位
There are three levels of password validation policy:
LOW Length >= 8
MEDIUM Length >= 8, numeric, mixed case, and special characters
STRONG Length >= 8, numeric, mixed case, special characters and dictionary file
Please enter 0 = LOW, 1 = MEDIUM and 2 = STRONG: 0
Please set the password for root here.
New password:
Re-enter new password:
#提示是否继续使用此密码规则,选择“y”
Estimated strength of the password: 100
Do you wish to continue with the password provided?(Press y|Y for Yes, any other key for No) : y
#删除匿名用户,选择“y”
By default, a MySQL installation has an anonymous user,
allowing anyone to log into MySQL without having to have
a user account created for them. This is intended only for
testing, and to make the installation go a bit smoother.
You should remove them before moving into a production
environment.
Remove anonymous users? (Press y|Y for Yes, any other key for No) : y
Success.
#禁止root远程登录,选择“y”
Normally, root should only be allowed to connect from
'localhost'. This ensures that someone cannot guess at
the root password from the network.
Disallow root login remotely? (Press y|Y for Yes, any other key for No) : y
Success.
#删除测试数据库,选择“y”
By default, MySQL comes with a database named 'test' that
anyone can access. This is also intended only for testing,
and should be removed before moving into a production
environment.
Remove test database and access to it? (Press y|Y for Yes, any other key for No) : y
- Dropping test database...
Success.
- Removing privileges on test database...
Success.
#重新加载权限表,选择“y”
Reloading the privilege tables will ensure that all changes
made so far will take effect immediately.
Reload privilege tables now? (Press y|Y for Yes, any other key for No) : y
Success.
All done!创建phpIPAM数据库和用户
此步骤并不是必须的,后续的安装向导中可以使用Root用户自动创建。
mysql -u root -p

create database phpipam;
CREATE USER 'phpipam'@'%' IDENTIFIED BY 'StrongPass123!';
GRANT ALL PRIVILEGES ON *.* TO 'phpipam'@'%' WITH GRANT OPTION;
配置并启动php-fpm环境
修改正确的时区,以使php警告和其他与时间相关的功能正确显示时间。
sudo sed -i "s/^;date.timezone =/date.timezone = Asia\/Shanghai/g" /etc/php.ini启动php-fpm服务。
sudo systemctl enable --now php-fpm配置Nginx服务器
这里推荐使用Nginx作为Web服务器,因为Nginx的速度更快,配置和管理SSL证书更加容易。 针对phpIPAM,我们可以使用两种不同的配置: 选项1:使用80端口提供服务,支持通过IP或域名访问
server {
    listen       80;
    server_name  _;
    server_tokens off;
    access_log      /var/log/nginx/phpipam.access.log;
    error_log       /var/log/nginx/phpipam.error.log;
    root         /var/www/phpipam;

    location / {
      try_files $uri $uri/ /index.php;
      index index.php;
    }

    location /api/ {
      try_files $uri $uri/ /api/index.php;
    }

    location ~ \.php$ {
      fastcgi_pass unix:/run/php-fpm/www.sock;
      fastcgi_index  index.php;
      try_files      $uri $uri/ index.php = 404;
      fastcgi_param  SCRIPT_FILENAME $document_root$fastcgi_script_name;
      include        fastcgi_params;
     }

     error_page 404 /404.html;
       location = /40x.html {
     }

     error_page 500 502 503 504 /50x.html;
       location = /50x.html {
     }
}
选项2:使用443端口提供服务,需要证书,支持通过域名访问
server {
    listen 80;
    server_name mgmt-ipam.corp.local;
    server_tokens off;
    location / {
        return 301 https://$server_name$request_uri;
    }
}

server {
    listen       443 ssl http2;
    listen       [::]:443 ssl http2;
    server_name  _;
    access_log      /var/log/nginx/phpipam.access.log;
    error_log       /var/log/nginx/phpipam.error.log;
    root         /var/www/phpipam;

    ssl_certificate "/usr/local/certs/mgmt-ipam-chain.pem";
    ssl_certificate_key "/usr/local/certs/mgmt-ipam-key.pem";
    ssl_session_cache shared:SSL:1m;
    ssl_session_timeout  10m;
    ssl_ciphers PROFILE=SYSTEM;
    ssl_prefer_server_ciphers on;

    location / {
      try_files $uri $uri/ /index.php;
      index index.php;
    }

    location /api/ {
      try_files $uri $uri/ /api/index.php;
    }

    location ~ \.php$ {
      fastcgi_pass unix:/run/php-fpm/www.sock;
      fastcgi_index  index.php;
      try_files      $uri $uri/ index.php = 404;
      fastcgi_param  SCRIPT_FILENAME $document_root$fastcgi_script_name;
      include        fastcgi_params;
     }

     error_page 404 /404.html;
       location = /40x.html {
     }

     error_page 500 502 503 504 /50x.html;
       location = /50x.html {
     }
}
最后需要删除/etc/nginx/nginx.conf中的以下部分,其与phpipam.conf有冲突; 注意:此部分内容是安装软件包时自动添加的。
    server {
        listen       80;
        listen       [::]:80;
        server_name  _;
        root         /usr/share/nginx/html;

        # Load configuration files for the default server block.
        include /etc/nginx/default.d/*.conf;

        error_page 404 /404.html;
        location = /404.html {
        }

        error_page 500 502 503 504 /50x.html;
        location = /50x.html {
        }
    }
设置Nginx自启动和启动服务。
sudo systemctl enable --now nginx打开防火墙的80和443端口,允许外部访问。
sudo firewall-cmd --permanent --add-port=80/tcp
sudo firewall-cmd --permanent --add-port=443/tcp
sudo firewall-cmd --reload
部署phpIPAM
phpIPAM的源代码文件,可以通过Git克隆的方式获取,并支持后期升级。 使用git克隆phpipam到/var/www下;
sudo git clone https://github.com/phpipam/phpipam.git /var/www/phpipam/
cd /var/www/phpipam
sudo git checkout 1.5
sudo cp config.dist.php config.php
更改文件权限,以支持访问和xls/csv导入;
cd /var/www
sudo chown nginx:nginx -R /var/www/phpipam/
sudo chcon -R -t httpd_sys_content_t /var/www/phpipam/

cd /var/www/phpipam/
find . -type f -exec chmod 0644 {} \;
find . -type d -exec chmod 0755 {} \;

sudo chcon -t httpd_sys_rw_content_t app/admin/import-export/upload/ -R
sudo chcon -t httpd_sys_rw_content_t app/subnets/import-subnet/upload/ -R
sudo chcon -t httpd_sys_rw_content_t css/images/logo/ -R
修改config.php配置文件,添加数据库连接信息。
sudo vi /var/www/phpipam/config.php
修改以下数据库连接内容:
/**
 * database connection details
 ******************************/
$db['host'] = 'localhost';
$db['user'] = 'phpipam';
$db['pass'] = 'StrongPass123!';
$db['name'] = 'phpipam';
$db['port'] = 3306;
重启Nginx服务
sudo systemctl restart nginx使用Web初始化PHPIPAM系统
浏览器访问http://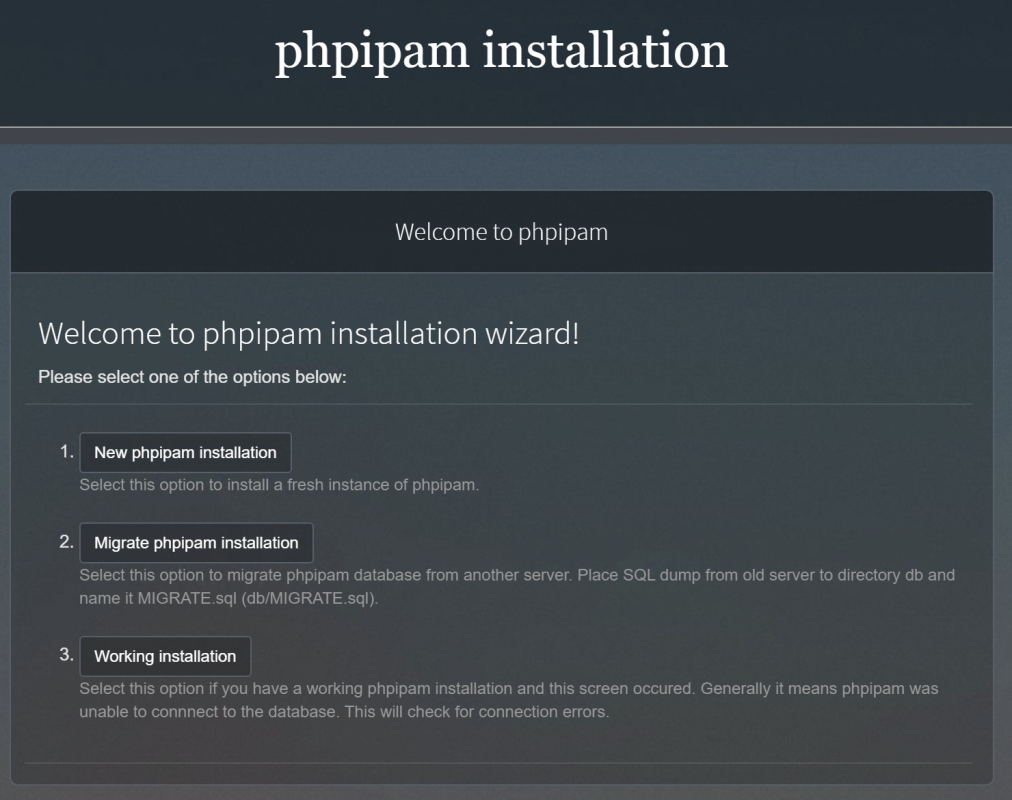
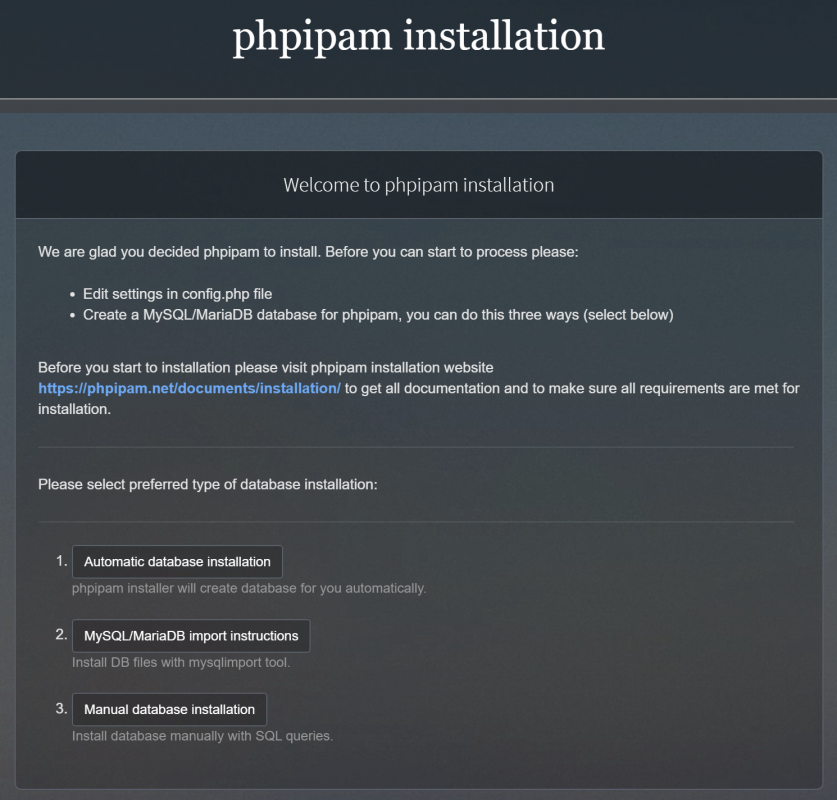
选择数据库初始化方式,此处选择“Automatic database installation”,自动化配置数据库。
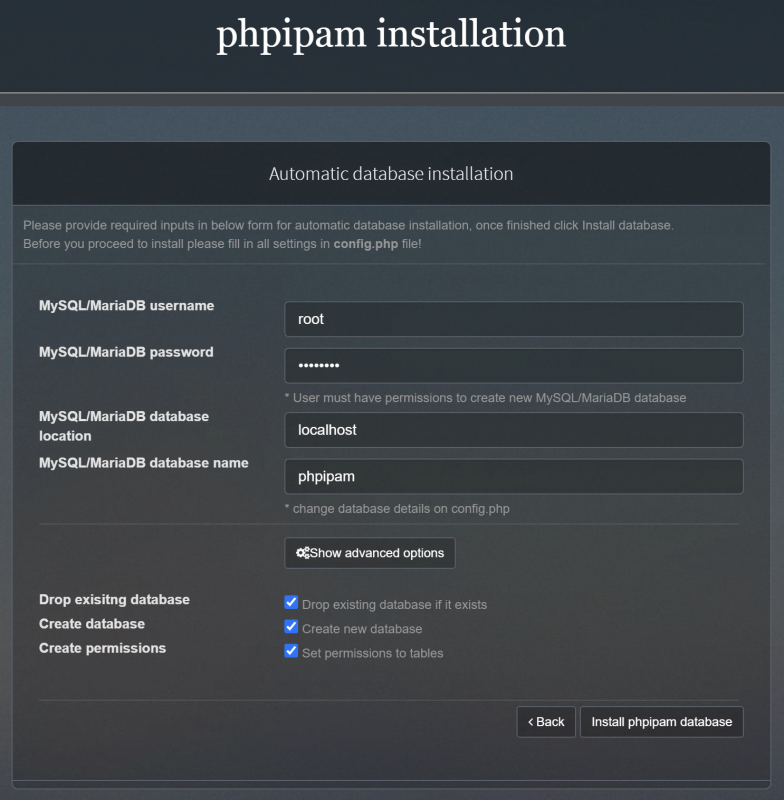
输入数据库的root账户和密码,点击“Install Phpipam database”。
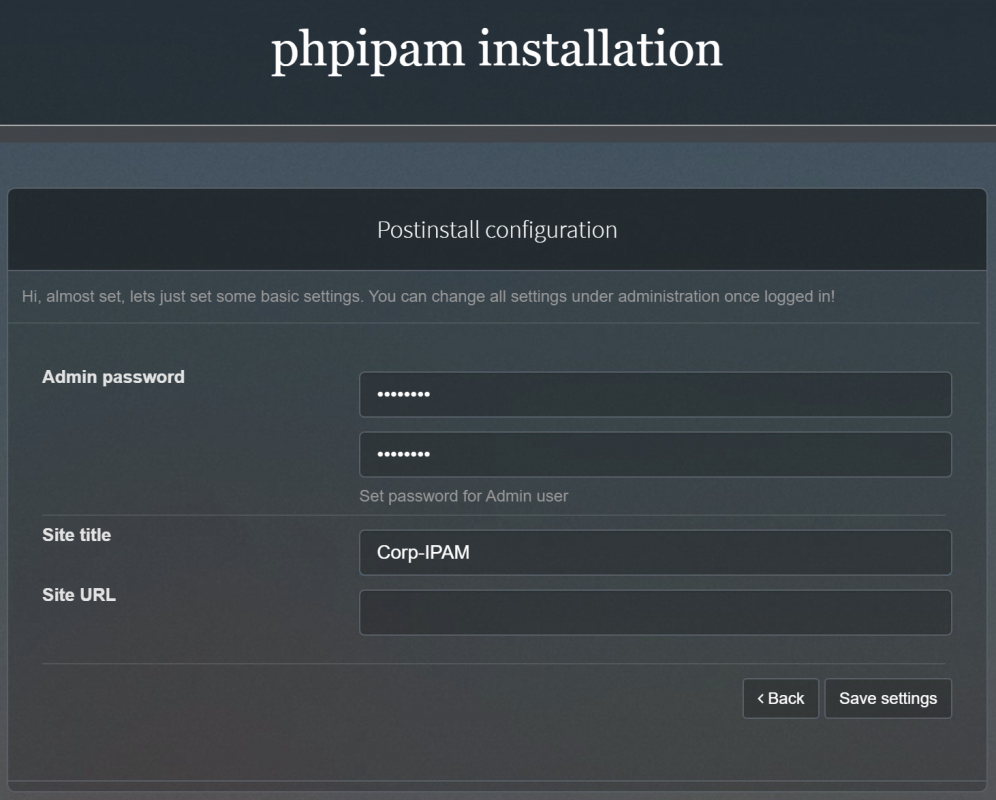
配置默认本地管理员密码,用户名为“Admin”,配置网站名称和站点访问URL(例如:使用域名访问)。
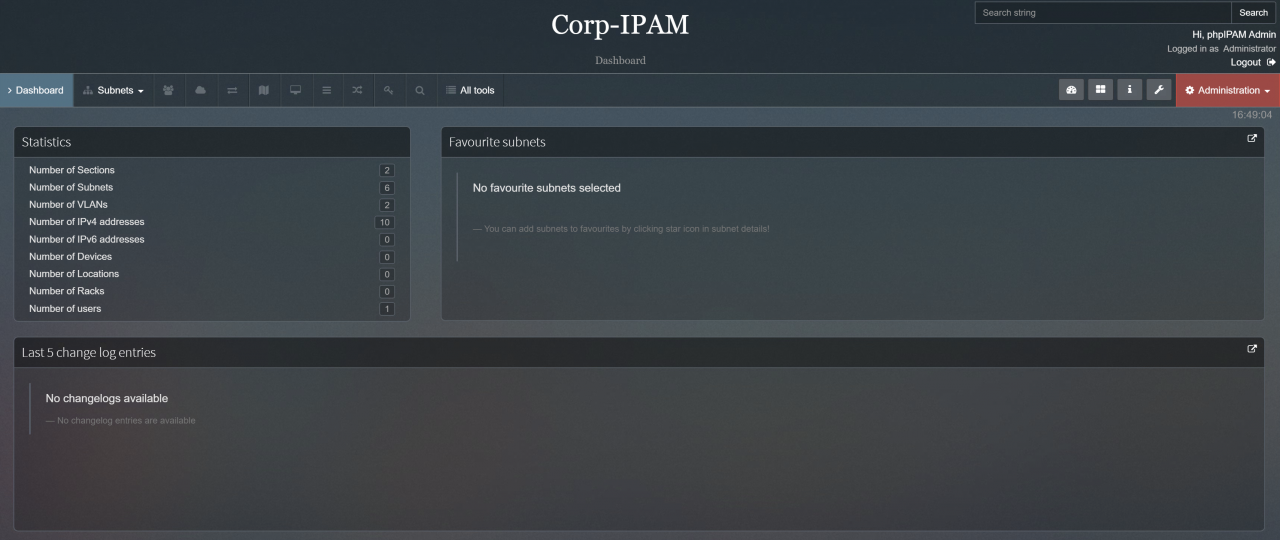
部署完成后,使用Admin用户登录系统。
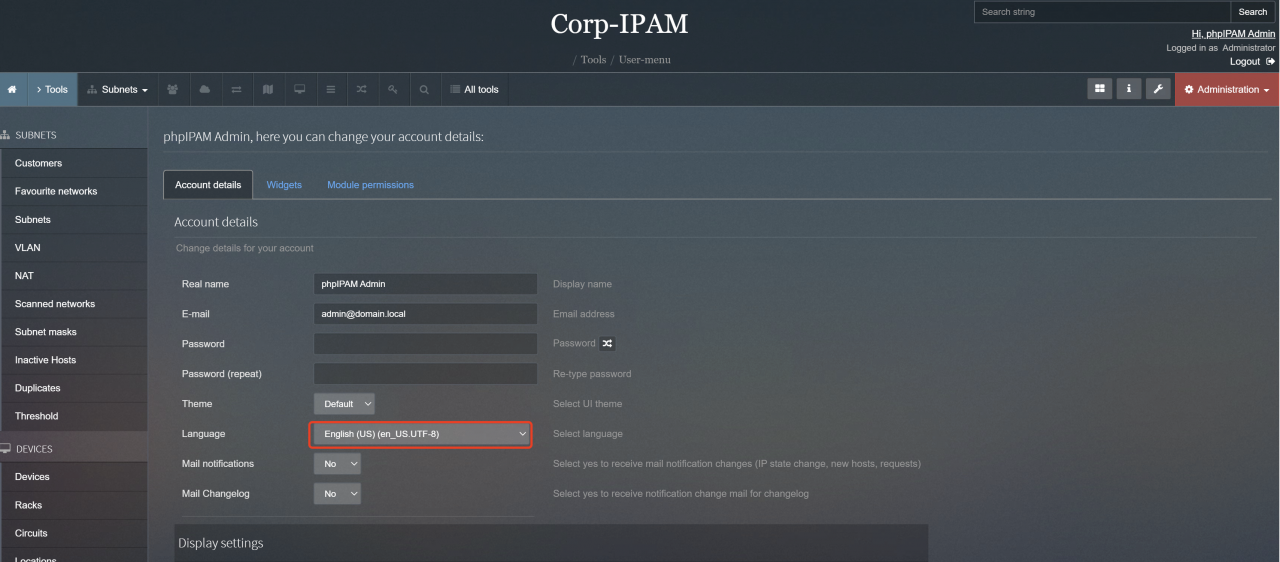
点击右上角的“用户”,可以配置页面语言为简体中文。
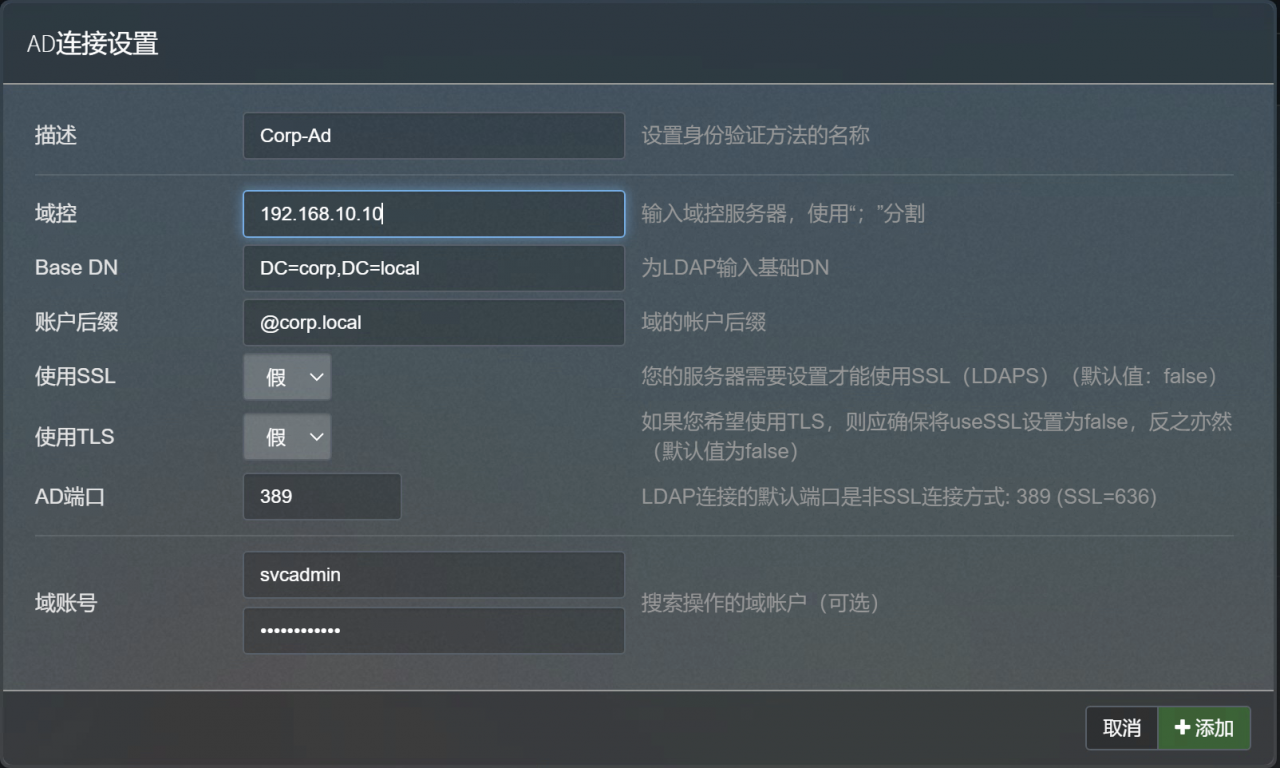
PHPIPAM支持多种认证方式,AD、LDAP、SAML2(单点登录),根据实际环境选择,这次以集成AD认证为示例。
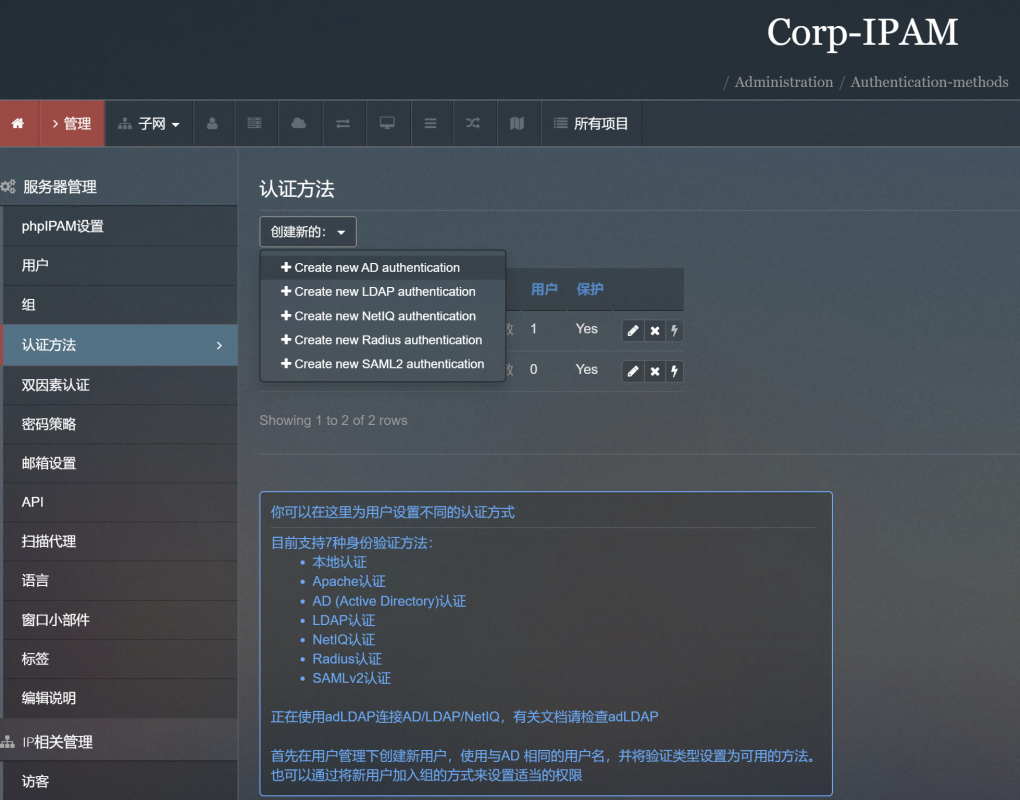
输入AD的连接信息后,点击“添加”。
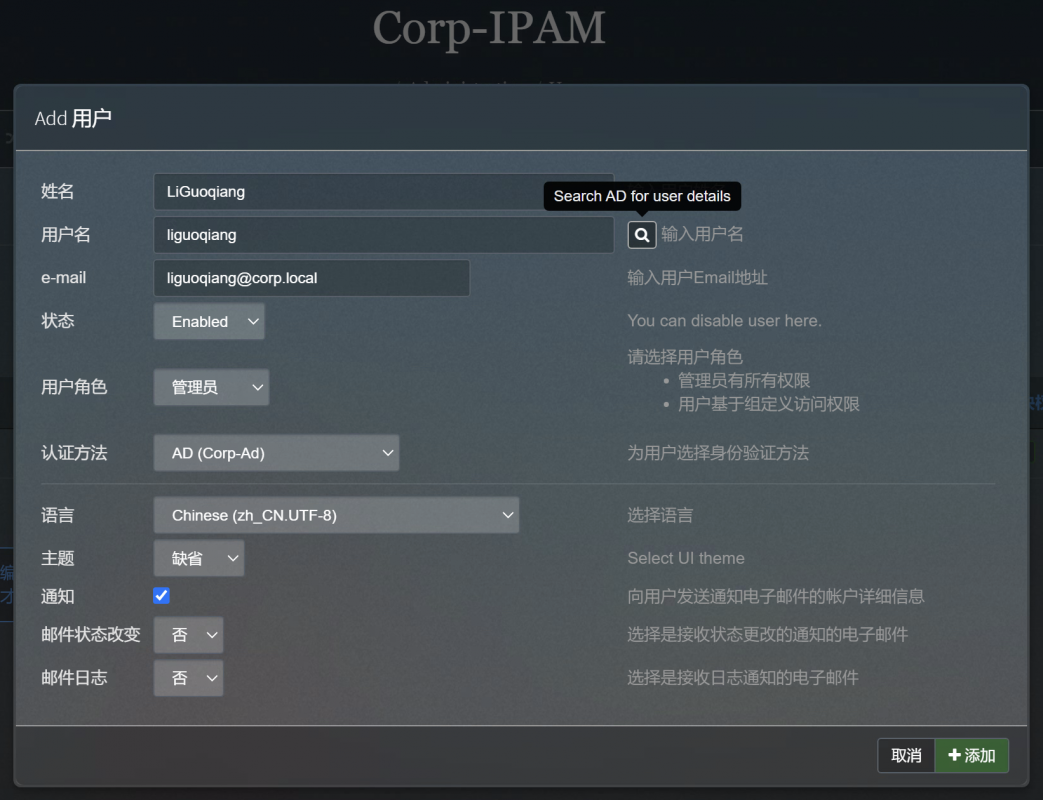
进入左侧的“服务器管理”->“用户”,添加AD认证用户到PHPIPAM中,点击右侧的“搜索”按钮,搜索AD中的用户,并添加,选择用户的角色“管理员”或“普通用户”,最后,点击“添加按钮”。
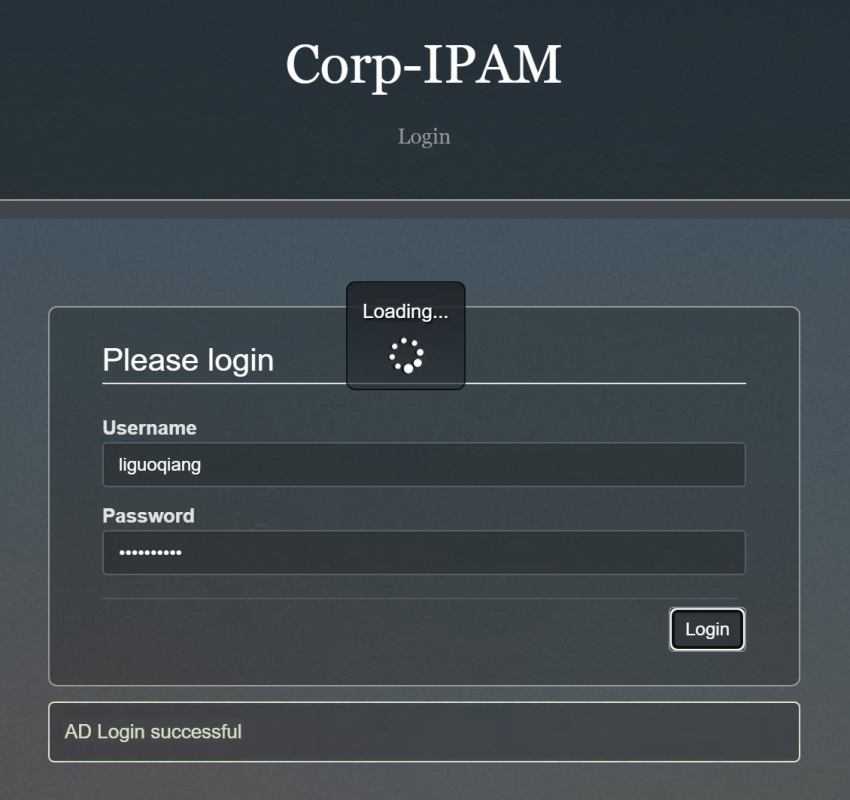
最终,我们成功使用AD用户登录到PHPIPAM系统。
完成
至此,我们完成了PHPIPAM的平台搭建,具体使用方法,请参考官网指导文档。