
概述:
最近规划升级Kubernetes整体架构,在CNI方面并对Cilium网络产生了兴趣,但Cilium对Linux内核版本有较高的要求(>=4.9.17),如果使用CentOS 7需要手工升级内核,最终决定直接使用CentOS 8系统,因为其默认内核版本为4.18。CentOS 8中增加了很多新特性,也使得Packer自动化构建有所不同,本博客介绍如何使用Packer在vSphere7.0环境中构建CentOS 8模版。
CentOS 8模版特性:
- 使用最新的vSphere7.0和CentOS 8.2;
- 增加虚拟机显存配置,以使虚拟机适配更大的视频分辨率;
- 自动删除模版CD-ROM;
- 通过光驱挂在ks.cfg文件(因为CentOS 8不支持软驱);
- 更新阿里云作为YUM和EPEL源;
- 更改网卡名为eth0;
- 禁用IPV6;
- 使用Chronyd作为默认时间同步,并配置NTP服务器;
- 打开CentOS 8默认Web管理工具-Cockpit;
- 调整分区为跟分区自动扩容,数据盘建议克隆时添加第二块次盘;
- 移除CentOS 8弃用组件和功能;
- 配置中国标准时区;
相关工具:
Packer是一个开源的自动化虚拟机模版构建工具,支持私有云和公有云,几乎涵盖所有的环境。 vSphere是VMware企业级虚拟化软件,被企业客户广泛使用,具备稳定性高、性能好、安全性高和易使用的特点。
相关代码中包含Packer所需的json文件和CentOS8的kickstart文件
kickstart语法参考中详细说明了kickstart的语法
VMware虚拟机硬件版本中详细列出了vSphere对虚拟机硬件版本的支持
使用时请根据实际环境进行修改
环境需求:
- 一台Windows/Linux/MacOS电脑,能够连接vCenter Server;
- Packer程序:https://packer.io/downloads.html
- CentOS 8.x ISO:https://wiki.centos.org/Download
Packer安装
Packer采用GO语言编写,安装非常简单,只需要将解压后的packer文件拷贝到系统bin目录下即可,下面是在Linux下的安装方式:
wget https://releases.hashicorp.com/packer/1.6.4/packer_1.6.4_linux_amd64.zip
unzip packer_1.6.4_linux_amd64.zip
cp packer /usr/loca/bin
chmod +x /usr/local/bin
packer version
CentOS 8的Packer模版
我们需要两个基础文件,用于使用Packer在vSphere环境中构建CentOS 8.x模版:
- centos-vsphere.json文件(Packer模版);
- ks.cfg文件(无人值守应答文件)
推荐下载仓库的文件,避免拷贝粘贴可能造成的字符问题;packer-vsphere
centos-vsphere.json文件说明
variables段落,用于定义vCenter的相关信息和虚拟机配置,其会在Builders段落引用,注意虚拟机文件夹需要预先创建好。
- iso_url:指定系统安装光盘位置,本示例使用vSphere环境构建,所以指定共享存储的路径;
- ks_iso:指定ks.cfg的光盘位置,本示例使用vSphere环境构建,所以指定共享存储的路径,此ISO需要自行制作;
- vm-cpu-num:定义虚拟机模版配置的CPU数量,通过模版再进行部署时可以修改;
- vm-disk-size:定义虚拟机磁盘容量(MB单位),后续的kickstart会基于此容量进行分区,/boot、swap、/var/log、/分区是固定的配置(通过修改ks.cfg更改);
- vm-folder:定义虚拟机模版保存在哪个文件夹中;
- vm-mem-size:定义虚拟机模版配置的内存容量(MB单位),通过模版再进行部署时可以修改;
- vm-name:定义虚拟机模版基础名称,在build阶段会自己增加日期后缀,以方便区别版本;
- vm-version:定义虚拟机使用什么硬件版本,当前vSphere7.0使用17,其他版本请查询相关工具中心的VMware虚拟机硬件版本;
- vm-video-ram:定义虚拟机显存容量(KB单位);
- 后续的vSphere参数,根据自己的环境配置。
  "variables": {
    "iso_url": "[SSD_DATASTORE] 0-ISO/CentOS-8.2.2004-x86_64-dvd1.iso",
    "ks_iso": "[SSD_DATASTORE] 0-ISO/centos8_ks.iso",
    "vm-cpu-num": "2",
    "vm-disk-size": "81920",
    "vm-folder": "Templates",
    "vm-mem-size": "4096",
    "vm-name": "CentOS8-T",
    "vm-version": "17",
    "vm-video-ram": "16384",
    "vsphere-cluster": "DC02-Cluster",
    "vsphere-datacenter": "Labs-DC02",
    "vsphere-datastore": "SSD_DATASTORE",
    "vsphere-network": "vlan100",
    "vsphere-password": "VMware1!",
    "vsphere-server": "vcenter.corp.local",
    "vsphere-user": "[email protected]"
}builders段落,用于真正的构建配置,本示例中将经常需要改变的部分通过variables定义,并在此阶段引用。
- vm_name:我们采用variables中的名字和日期进行组合,isotime会获取当前日期;
- notes:显示在虚拟机的备注属性中,用于查看模版具体的构建时间;
- guest_os_type:定义虚拟机客户机操作系统,可以通VMware官方文档或者创建虚拟机后查询.vmx文件获得正确的客户机操作系统代码;
- ssh_username:定义provisioners阶段连接模版虚拟机的口令,此口令来自ks.cfg中的配置;
- disk_controller_type:定义虚拟机的SCSI控制器类型,这里采用更高性能的VMware准虚拟;
- disk_thin_provisioned:定义虚拟机是否使用精简磁盘;
- network_card:网卡类型,这里选择了性能最好的vmxnet3;
- convert_to_template:定义是否自动转换成模版,请根据需要选择,如果虚拟机部署编排工具不支持从模版克隆,就需要配置为false;
- iso_paths:定义两个光驱加载文件,一个是操作系统盘,一个是ks.cfg盘;
- remove_cdrom:定义模版构建完成后删除所有光驱;
"builders": [ { "CPUs": "{{user `vm-cpu-num`}}", "RAM": "{{user `vm-mem-size`}}", "RAM_reserve_all": false, "boot_command": [ "<esc><wait>", "linux ks=hd:sr1:/ks.cfg<enter>" ], "boot_order": "disk,cdrom", "boot_wait": "10s", "cluster": "{{user `vsphere-cluster`}}", "convert_to_template": true, "datacenter": "{{user `vsphere-datacenter`}}", "datastore": "{{user `vsphere-datastore`}}", "disk_controller_type": "pvscsi", "folder": "{{user `vm-folder`}}", "guest_os_type": "centos8_64Guest", "insecure_connection": "true", "remove_cdrom": "true", "iso_paths": [ "{{user `iso_url`}}", "{{user `ks_iso`}}" ], "network_adapters": [ { "network": "{{user `vsphere-network`}}", "network_card": "vmxnet3" } ], "notes": "Build via Packer in {{isotime \"2006-01-02\"}}", "password": "{{user `vsphere-password`}}", "ssh_password": "VMware1!", "ssh_username": "root", "storage": [ { "disk_size": "{{user `vm-disk-size`}}", "disk_thin_provisioned": true } ], "type": "vsphere-iso", "username": "{{user `vsphere-user`}}", "vcenter_server": "{{user `vsphere-server`}}", "video_ram": "{{user `vm-video-ram`}}", "vm_name": "{{user `vm-name`}}-{{isotime \"2006-01-02\"}}", "vm_version": "{{user `vm-version`}}" } ],provissioners段落,用于系统自动化安全完成后的自定义操作,例如:更新系统补丁,清理模版等,本示例中进行了系统更新。
"provisioners": [
{
  "inline": [
    "yum install -y https://mirrors.aliyun.com/epel/epel-release-latest-8.noarch.rpm",
    "sed -i 's|^#baseurl=https://download.fedoraproject.org/pub|baseurl=https://mirrors.aliyun.com|' /etc/yum.repos.d/epel*",
    "sed -i 's|^metalink|#metalink|' /etc/yum.repos.d/epel*",
    "yum update -y",
    "yum clean all",
    "systemctl enable --now cockpit.socket"
  ],
  "type": "shell"
}
],
ks.cfg文件说明
kickstart文件的介绍很多,这里不进行详细介绍,可以参考官方文档说明,下面仅针对我定制化的内容进行说明;
- 第9行rootpw,定义root密码,--plainetext参数表示不会在部署目标系统中记录密码;
- 第20行bootloader,更改默认网卡名为eth0,禁用ipv6;
- 第26行network,设定虚拟机网络和主机名,本示例采用dhcp,如果使用静态IP地址请参考上一行;
- 第33行lang,设定语言支持,添加简体中文;
- 第39行timezone,设定亚洲/上海时区,并配置NTP服务器;
- 第47-61行,定义磁盘分区,按照企业生产规范进行分区,采用xfs文件系统,采用lvm以便后期扩展;
- 第143-149行,删除系统无用用户,减少风险;
- 第156-158行,创建本地用户ops,用于应用用户登陆,请根据实际情况定义;
- 第164-168行,授权ops用户sudo权限,请根据实际情况定义;
- 第184-187行,优化SSH登录速度;
- 第192-197行,优化系统最大打开文件参数;请根据实际情况定义;
- 第217-228行,清理模版中的网卡UUID和更改ifcfg-eth0参数;此示例采用DHCP;
- 第234-273行,用于静态IP地址配置和禁用NetworkManager管理DNS;
- 第315-385行,更改系统默认yum源为aliyun;请根据企业环境进行修改,一般内网使用yum私服(例如:nexus3);
本示例中的密码均为VMware1!,请注意自行修改。
# Base CentOS 8.x install

firewall --disabled
selinux --disabled

#--------------------------------------------------------------------------
# set password for root
#--------------------------------------------------------------------------
rootpw --plaintext VMware1!

#--------------------------------------------------------------------------
# set bootloader and use eth0
#--------------------------------------------------------------------------
## bootloader
# elevator=noop - Use a simple FIFO queue for I/O algorithm since hypervisor will also manage this
# pci=bfsort    - Breadth-first pci order for NIC enumeration
# net.ifnames=0 - Disable predictable network interface naming
# biosdevname=0 - Disables consistent network interface naming
bootloader --location=mbr --append="pci=bfsort net.ifnames=0 biosdevname=0 ipv6.disable=1"

#--------------------------------------------------------------------------
# Config network use dhcp
#--------------------------------------------------------------------------
# network --bootproto=static --ip=192.168.10.100 --netmask=255.255.255.0 --gateway=192.168.10.1 --nameserver 192.168.10.1,192.168.10.2
network --bootproto=dhcp --device=eth0 --noipv6 --onboot=yes --device=eth0 --hostname=CentOS8Template --activate

authconfig --enableshadow --passalgo=sha512

keyboard --vckeymap=us --xlayouts='us'

# Set language to use during installation and the default language to use on the installed system (required)
lang en_US.UTF-8 --addsupport=zh_CN.UTF-8
skipx
install
#--------------------------------------------------------------------------
# set timezone and ntp
#--------------------------------------------------------------------------
timezone Asia/Shanghai --ntpservers=192.168.10.4
eula --agreed
services --enabled=NetworkManager,sshd

#--------------------------------------------------------------------------
# Setup disk and LVM
#--------------------------------------------------------------------------
zerombr

# Only partition sda, leave other disks unpartitioned
ignoredisk --only-use=sda
clearpart --all --drives=sda

part /boot --fstype=xfs --size=512
part pv.01 --grow --size=1

volgroup sys_vg pv.01
logvol / --fstype=xfs --name=root --vgname=sys_vg --size=1 --grow
logvol swap --name=swap --vgname=sys_vg --size=8192
logvol /tmp --fstype=xfs --name=tmp --vgname=sys_vg --size=4096
logvol /usr --fstype=xfs --name=usr --vgname=sys_vg --size=10240
logvol /var/log --fstype=xfs --name=var_log --vgname=sys_vg --size=8192
#logvol /app-data --fstype=xfs --name=app-data --vgname=sys_vg --size=1 --grow

#--------------------------------------------------------------------------
# Select packages for installation
#--------------------------------------------------------------------------
%packages --ignoremissing
Require @Base
@Base
@core
biosdevname
sed
perl
less
dmidecode
bzip2
iproute
iputils
sysfsutils
rsync
nano
mdadm
setserial
man-pages.noarch
findutils
tar
net-tools
tmpwatch
lsof
python
screen
lvm2
curl
ypbind
yp-tools
smartmontools
openssh-clients
acpid
irqbalance
which
bind-utils
ntsysv
man
open-vm-tools
vim
lrzsz
wget
tree
screen
tcpdump
#mysql
#postfix
chkconfig
gzip
%end
# End of %packages section

#--------------------------------------------------------------------------
# Run post installation script
#--------------------------------------------------------------------------
%post --log=/root/ks-post.log
#!/bin/sh
(
set -x

#--------------------------------------------------------------------------
# Disable the tiered-progress bar during boot
#--------------------------------------------------------------------------
/bin/sed -i -e 's/ rhgb//' -e 's/ quiet//'  /boot/grub2/grub.cfg
/bin/sed -i -e 's/ rhgb//' -e 's/ quiet//'  /etc/grub2.cfg
/bin/sed -i -e 's/ rhgb//' -e 's/ quiet//'  /etc/default/grub

plymouth-set-default-theme text
/usr/libexec/plymouth/plymouth-update-initrd

#--------------------------------------------------------------------------
# Remove default user/group accounts that are not needed
#--------------------------------------------------------------------------
/usr/sbin/userdel operator
/usr/sbin/userdel games
/usr/sbin/userdel lp
/usr/sbin/userdel sync
/usr/sbin/userdel shutdown
/usr/sbin/userdel halt
/usr/sbin/groupdel games

#--------------------------------------------------------------------------
# Create local ops user with password "VMware1!"
#--------------------------------------------------------------------------

/usr/sbin/useradd ops; echo 'VMware1!' | passwd --stdin ops
/usr/sbin/usermod -a -G wheel ops
/usr/bin/chage -M -1 -E -1 ops

#--------------------------------------------------------------------------
# Add local ops user to sudoers
#--------------------------------------------------------------------------
/bin/cat <<'EOF'>> /etc/sudoers

Defaults:ops !requiretty
ops ALL=(ALL) NOPASSWD: ALL
EOF

#--------------------------------------------------------------------------
# sync hardware clock
#--------------------------------------------------------------------------
/sbin/hwclock --systohc --utc

#--------------------------------------------------------------------------
# configure NTP

#--------------------------------------------------------------------------
# SSHD setup
#--------------------------------------------------------------------------
/bin/sed -i /etc/ssh/sshd_config \
         -e 's/^#UseDNS yes$/UseDNS no/' \
         -e 's/^GSSAPIAuthentication yes$/GSSAPIAuthentication no/' \
         # -e 's/^#PermitRootLogin yes/PermitRootLogin no/'

#--------------------------------------------------------------------------
# Increase open file limmits
#--------------------------------------------------------------------------
/bin/cat <<'EOF'>> /etc/sysctl.conf

# Increases maximum open file limmit
fs.file-max = 65536

EOF

/bin/cat <<'EOF'>> /etc/security/limits.conf
# Custom configuration files in /etc/security/limits.d
EOF

/bin/cat <<'EOF'> /etc/security/limits.d/10-nofile.conf
*               soft    nofile          65535
*               hard    nofile          65535
EOF

/bin/cat <<'EOF'> /etc/security/limits.d/11-stack.conf
*               soft    stack           65535
*               hard    stack           65535
EOF

#--------------------------------------------------------------------------
# Remove hard coded UUID + MAC from network device configs and DNS/Gateway information
#--------------------------------------------------------------------------
/bin/sed -i '/^DNS1*..*$/d' /etc/sysconfig/network-scripts/ifcfg-e*
/bin/sed -i '/^DNS2*..*$/d' /etc/sysconfig/network-scripts/ifcfg-e*
/bin/sed -i '/^GATEWAY*..*$/d' /etc/sysconfig/network-scripts/ifcfg-e*
/bin/sed -i '/^HOSTNAME*..*$/d' /etc/sysconfig/network-scripts/ifcfg-e*
/bin/sed -i '/^HWADDR*..*$/d' /etc/sysconfig/network-scripts/ifcfg-e*
/bin/sed -i '/^NM_CONTROLLED*..*$/d' /etc/sysconfig/network-scripts/ifcfg-e*
/bin/sed -i '/^UUID*..*$/d' /etc/sysconfig/network-scripts/ifcfg-e*

/bin/mv /etc/sysconfig/network-scripts/ifcfg-e* /etc/sysconfig/network-scripts/ifcfg-eth0
/bin/sed -i 's/ens192/eth0/g' /etc/sysconfig/network-scripts/ifcfg-eth0
/bin/sed -i "s\ONBOOT=no\ONBOOT=yes\g" /etc/sysconfig/network-scripts/ifcfg-eth0
/bin/sed -i "s\IPV6INIT=yes\IPV6INIT=no\g" /etc/sysconfig/network-scripts/ifcfg-eth0

#--------------------------------------------------------------------------
# Update ifcfg-eth0 to use static ip address
#--------------------------------------------------------------------------
#/bin/rm -rf /etc/sysconfig/network-scripts/ifcfg-eth*
#/bin/cat <<'EOF'>> /etc/sysconfig/network-scripts/ifcfg-eth0
#TYPE=Ethernet
#PROXY_METHOD=none
#BROWSER_ONLY=no
#BOOTPROTO=static
#DEFROUTE=yes
#IPV4_FAILURE_FATAL=no
#IPV6INIT=no
#IPV6_AUTOCONF=no
#IPV6_DEFROUTE=no
#IPV6_FAILURE_FATAL=no
#IPV6_ADDR_GEN_MODE=stable-privacy
#NAME=eth0
#DEVICE=eth0
#ONBOOT=yes
#IPADDR=192.168.10.100
#NETMASK=255.255.255.0
#GATEWAY=192.168.10.1
#DNS1=192.168.10.1
#DOMAIN=corp.local
#EOF

#--------------------------------------------------------------------------
# Configure NetworkManager
#--------------------------------------------------------------------------
#/bin/cat <<'EOF'> /etc/NetworkManager/conf.d/11-corp.conf
#[main]
#no-auto-default=*
#dns=none
#EOF

#--------------------------------------------------------------------------
# Configure DNS
#--------------------------------------------------------------------------
#/bin/cat <<'EOF'> /etc/resolv.conf
#nameserver 192.168.10.1
#EOF

#--------------------------------------------------------------------------
# For root, disable color "ls", and use old style sorting order.
#--------------------------------------------------------------------------
touch /root/.dir_colors

/bin/cat <<'EOF'>> /root/.i18n
LC_COLLATE=C
EOF

#--------------------------------------------------------------------------
# Setup logrotate configuration
#--------------------------------------------------------------------------
/bin/cat <<'EOF'> /etc/logrotate.conf
# see "man logrotate" for details
# rotate log files monthly
monthly

# keep 12 months worth of backlogs
rotate 12

# create new (empty) log files after rotating old ones
create

# uncomment this if you want your log files compressed
compress

# RPM packages drop log rotation information into this directory
include /etc/logrotate.d

# no packages own wtmp -- we'll rotate them here
/var/log/wtmp {
    create 0664 root utmp
}
EOF

#--------------------------------------------------------------------------
# Setup default yum repos for centos8
#--------------------------------------------------------------------------
/bin/mv /etc/yum.repos.d/CentOS-AppStream.repo /etc/yum.repos.d/CentOS-AppStream.repo.bak
/bin/mv /etc/yum.repos.d/CentOS-Base.repo /etc/yum.repos.d/CentOS-Base.repo.bak
/bin/mv /etc/yum.repos.d/CentOS-centosplus.repo /etc/yum.repos.d/CentOS-centosplus.repo.bak
/bin/mv /etc/yum.repos.d/CentOS-Extras.repo /etc/yum.repos.d/CentOS-Extras.repo.bak
/bin/mv /etc/yum.repos.d/CentOS-PowerTools.repo /etc/yum.repos.d/CentOS-PowerTools.repo.bak

/bin/cat <<'EOF'> /etc/yum.repos.d/CentOS-Base.repo
# CentOS-Base.repo
#
# The mirror system uses the connecting IP address of the client and the
# update status of each mirror to pick mirrors that are updated to and
# geographically close to the client.  You should use this for CentOS updates
# unless you are manually picking other mirrors.
#
# If the mirrorlist= does not work for you, as a fall back you can try the
# remarked out baseurl= line instead.
#
#

[base]
name=CentOS-$releasever - Base - mirrors.aliyun.com
failovermethod=priority
baseurl=https://mirrors.aliyun.com/centos/$releasever/BaseOS/$basearch/os/
        http://mirrors.aliyuncs.com/centos/$releasever/BaseOS/$basearch/os/
        http://mirrors.cloud.aliyuncs.com/centos/$releasever/BaseOS/$basearch/os/
gpgcheck=1
gpgkey=https://mirrors.aliyun.com/centos/RPM-GPG-KEY-CentOS-Official

#additional packages that may be useful
[extras]
name=CentOS-$releasever - Extras - mirrors.aliyun.com
failovermethod=priority
baseurl=https://mirrors.aliyun.com/centos/$releasever/extras/$basearch/os/
        http://mirrors.aliyuncs.com/centos/$releasever/extras/$basearch/os/
        http://mirrors.cloud.aliyuncs.com/centos/$releasever/extras/$basearch/os/
gpgcheck=1
gpgkey=https://mirrors.aliyun.com/centos/RPM-GPG-KEY-CentOS-Official

#additional packages that extend functionality of existing packages
[centosplus]
name=CentOS-$releasever - Plus - mirrors.aliyun.com
failovermethod=priority
baseurl=https://mirrors.aliyun.com/centos/$releasever/centosplus/$basearch/os/
        http://mirrors.aliyuncs.com/centos/$releasever/centosplus/$basearch/os/
        http://mirrors.cloud.aliyuncs.com/centos/$releasever/centosplus/$basearch/os/
gpgcheck=1
enabled=0
gpgkey=https://mirrors.aliyun.com/centos/RPM-GPG-KEY-CentOS-Official

[PowerTools]
name=CentOS-$releasever - PowerTools - mirrors.aliyun.com
failovermethod=priority
baseurl=https://mirrors.aliyun.com/centos/$releasever/PowerTools/$basearch/os/
        http://mirrors.aliyuncs.com/centos/$releasever/PowerTools/$basearch/os/
        http://mirrors.cloud.aliyuncs.com/centos/$releasever/PowerTools/$basearch/os/
gpgcheck=1
enabled=0
gpgkey=https://mirrors.aliyun.com/centos/RPM-GPG-KEY-CentOS-Official

[AppStream]
name=CentOS-$releasever - AppStream - mirrors.aliyun.com
failovermethod=priority
baseurl=https://mirrors.aliyun.com/centos/$releasever/AppStream/$basearch/os/
        http://mirrors.aliyuncs.com/centos/$releasever/AppStream/$basearch/os/
        http://mirrors.cloud.aliyuncs.com/centos/$releasever/AppStream/$basearch/os/
gpgcheck=1
gpgkey=https://mirrors.aliyun.com/centos/RPM-GPG-KEY-CentOS-Official

EOF

#--------------------------------------------------------------------------
# Remove UUID for /boot in fstab
#--------------------------------------------------------------------------
/bin/sed -i "s/UUID*..*\/boot/\/dev\/sda1\t\t\/boot/" /etc/fstab

#--------------------------------------------------------------------------
# Symlink /var/tmp to /tmp
#--------------------------------------------------------------------------
/bin/rm -rf /var/tmp
/bin/ln -s /tmp /var/tmp

#--------------------------------------------------------------------------
# Enable or Disable Specific OS Services/Daemons
#--------------------------------------------------------------------------
/usr/bin/systemctl enable autofs
/usr/bin/systemctl enable ntpd
/usr/bin/systemctl disable firewalld.service
/usr/bin/systemctl disable auditd
/usr/bin/systemctl disable mdmonitor
/usr/bin/systemctl disable postfix
/usr/bin/systemctl disable abrt-ccpp.service
/usr/bin/systemctl disable abrt-oops.service
/usr/bin/systemctl disable abrt-vmcore.service
/usr/bin/systemctl disable abrt-xorg.service
/usr/bin/systemctl disable abrtd.service
/usr/bin/systemctl disable iscsi.service
/usr/bin/systemctl disable iscsid.socket
/usr/bin/systemctl disable iscsiuio.socket
/usr/bin/systemctl disable libstoragemgmt.service
/usr/bin/systemctl disable multipathd.service
/usr/bin/systemctl disable wpa_supplicant.service

#--------------------------------------------------------------------------
# End of post
#--------------------------------------------------------------------------
) 2>&1
%end

# Reboot after the installation is complete (optional)
# --eject   attempt to eject CD or DVD media before rebooting
reboot --eject
制作ks.cfg光盘
使用genisoimage命令制作ks.cfg的光盘镜像,并上传到虚拟化存储中。
genisoimage -o centos8_ks.iso -V "OEMDRV" ks.cfgPacker验证配置
完成配置文件的准备后,我们需要验证packer的配置文件是否正确,使用以下命令:
packer validate centos-vsphere.jsonPacker执行构建
packer build centos-vsphere.json如果第一次构建成功,并且虚拟机名称是固定的(本示例是基于日期的)下一次构建时可以增加-force参数覆盖上一次模版;
packer build -froce centos-vsphere.json检查构建结果
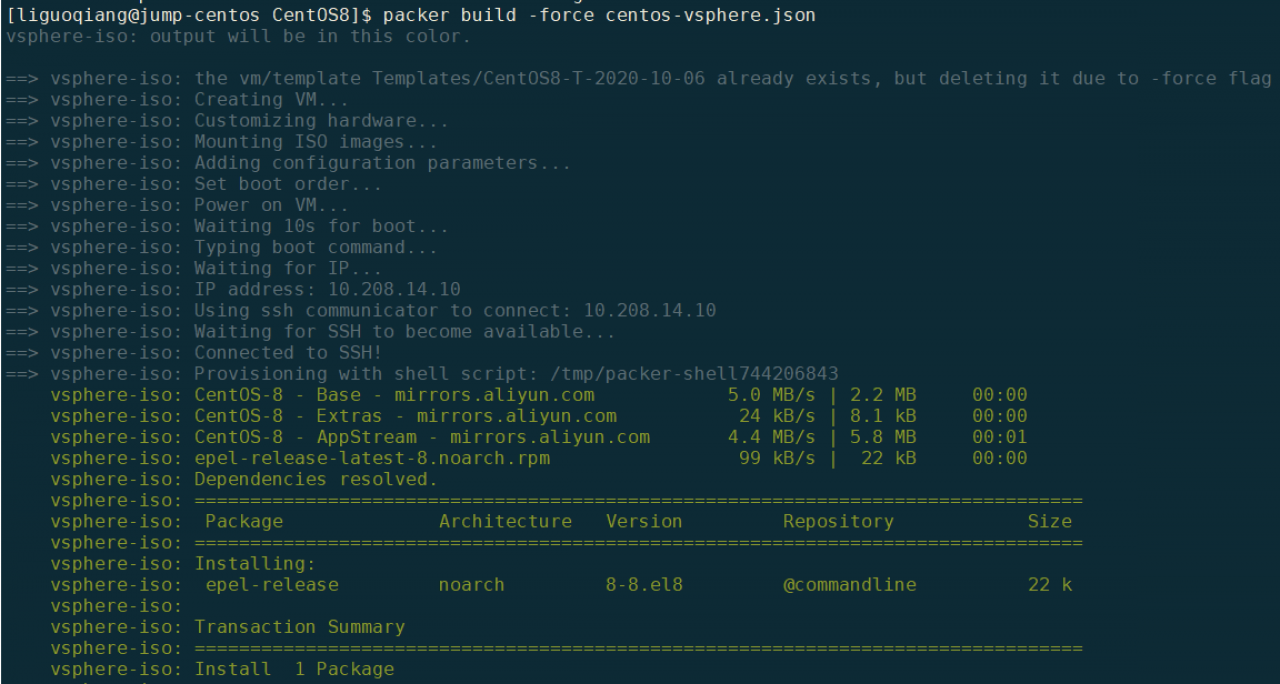
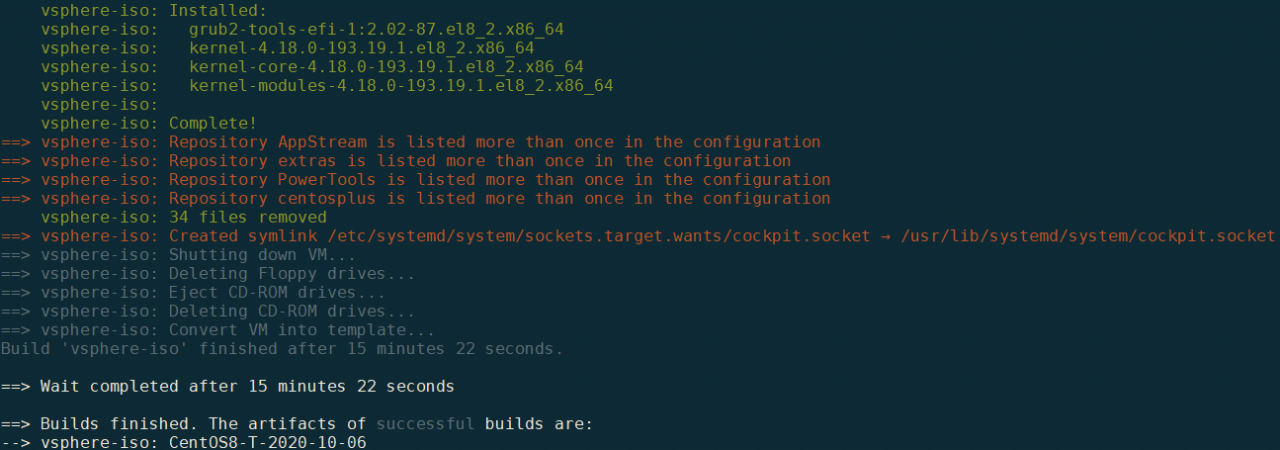
构建完成后,命令行如下提示;
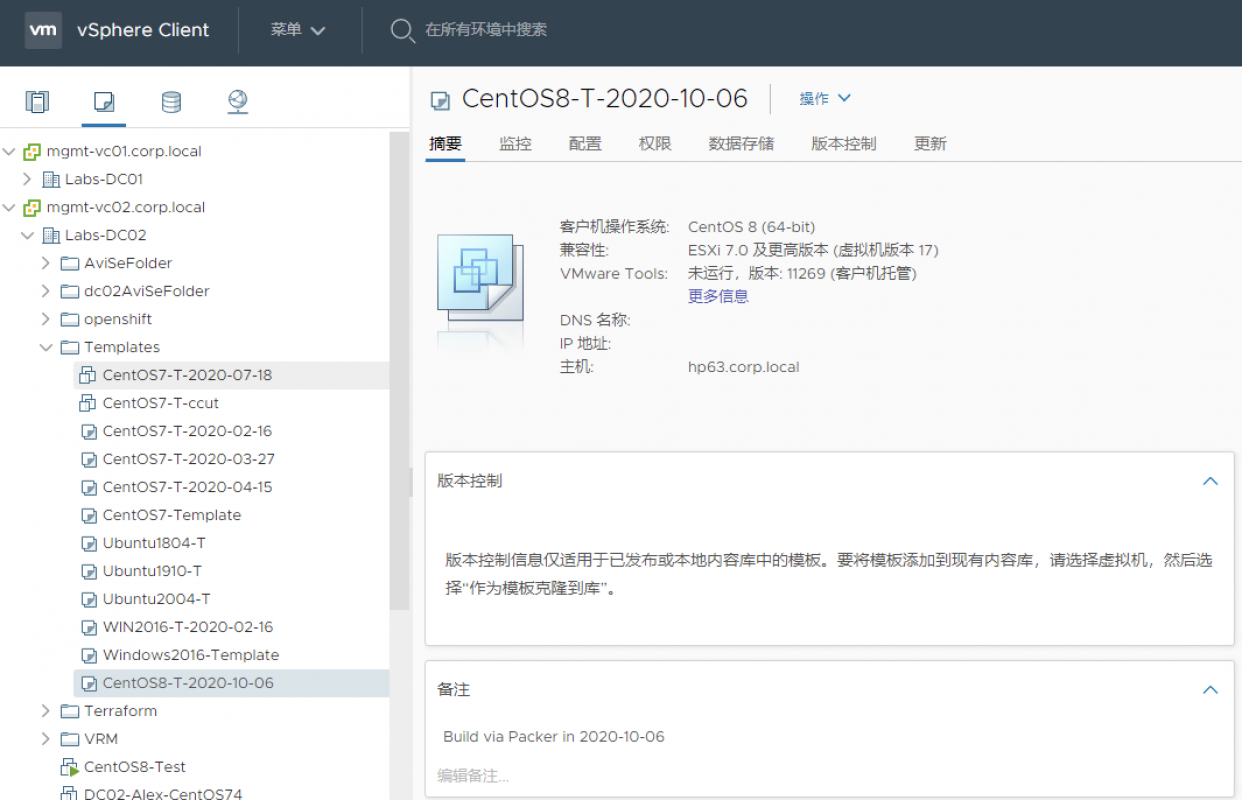
登陆到vSpehre中可以看到模版:
完成
至此通过Packer实现了vSphere7.0环境下CentOS 8虚拟机模版的自动构建,如果希望构建其他环境可以参考我之前发布的文档或官方文档。