
概述
前面我们制作了Windows Server 2016/2019和CentOS7的模版,还差一个主流的Linux发行版-Ubuntu,今天有时间把18.04、19.10和20.04三个版本的模版制作完成,并且升级到最新的Packer 1.6.0版本和vSphere7.0版本,希望对大家有帮助。
本示例对Ubuntu模版进行了如下的特性定制:
- 使用VMware准虚拟SCSI控制器(SCSI);
- 添加中文支持;
- 配置中国时区;
- 更改为Ubuntu中国源;
- 启用Root账户和Root账户SSH登录;
- 创建Ops运维账户;
- 基于LVM进行分区,并采用xfs分区格式;
- 安装常用工具和VMware Tools;
- 更改ens192为eth0;
- 清理Machine-id;
提示,由于Packer示例中,模版名是以日期作为后缀的,所以每天只会产生一个模版,同时如果做计划任务,每天都会有一个模版,要注意清理,避免过度占用磁盘空间。
相关工具:
Packer是一个开源的自动化虚拟机模版构建工具,支持私有云和公有云,几乎涵盖所有的环境。 vSphere是VMware企业级虚拟化软件,被企业客户广泛使用,具备稳定性高、性能好、安全性高和易使用的特点。
Ubuntu18.04相关代码中包含Packer所需的json文件和Ubuntu18.04的preseed.cfg文件 Ubuntu19.10相关代码中包含Packer所需的json文件和Ubuntu19.10的preseed.cfg文件 Ubuntu20.04相关代码中包含Packer所需的json文件和Ubuntu20.04的preseed.cfg文件
preseed语法参考中详细说明了preseed的语法
VMware虚拟机硬件版本中详细列出了vSphere对虚拟机硬件版本的支持
使用时请根据实际环境进行修改,我采用最新的vSpehre7.0版本。
环境需求:
- 一台Windows/Linux/MacOS电脑,能够连接vCenter Server;
- Packer程序:https://packer.io/downloads.html
- Ubuntu 18.04 ISO:http://cdimage.ubuntu.com/releases/18.04/release/
- Ubuntu 19.10 ISO:http://cdimage.ubuntu.com/releases/19.10/release/
- Ubuntu 20.04 ISO:http://cdimage.ubuntu.com/ubuntu-legacy-server/releases/20.04/release/
Packer安装
Packer采用GO语言编写,安装非常简单,只需要将解压后的packer文件拷贝到系统bin目录下即可,下面是在Linux下的安装方式:
wget https://releases.hashicorp.com/packer/1.6.0/packer_1.6.0_linux_amd64.zip
unzip packer_1.6.0_linux_amd64.zip
cp packer /usr/loca/bin
chmod +x /usr/local/bin
packer version
Ubuntu的Packer模版
我们需要两个基础文件,用于使用Packer在vSphere环境中构建Ubuntu模版:
- ubuntu-vsphere.json文件(Packer模版);
- preseed.cfg文件(Ubuntu无人值守安装文件);
推荐下载仓库的文件,避免拷贝粘贴可能造成的字符问题;packer-vsphere
ubuntu-vsphere.json文件说明
variables段落,用于定义vCenter的相关信息和虚拟机配置,其会在Builders段落引用,注意虚拟机文件夹需要预先创建好。
- vm-name:定义虚拟机模版基础名称,在build阶段会自己增加日期后缀,以方便却别版本;
- vm-version:定义虚拟机使用什么硬件版本,当前vSphere6.7U3使用15,其他版本请查询相关工具中心的VMware虚拟机硬件版本;
- vm-folder:定义虚拟机模版保存在哪个文件夹中;
- vm-cpu-num:定义虚拟机模版配置的CPU数量,通过模版再进行部署时可以修改;
- vm-mem-size:定义虚拟机模版配置的内存容量(MB单位),通过模版进行部署时可以修改;
- vm-disk-size:定义虚拟机磁盘容量(MB单位),后续的preseed会基于此容量进行分区,/boot、swap、/var/log、/分区是固定的配置(通过修改preseed.cfg更改),/app-date用于存放应用,会使用所有剩余空间;
- iso_url:指定系统安装光盘位置,本示例使用vSphere环境构建,所以指定共享存储的路径;
- vm-video-ram:指定虚拟机显存大小(只有这个选项是KB单位,其他都是MB单位)
提示1:为保证ISO文件有效,可以通过参数(iso_checksum、iso_checksum_type和iso_checksum_url)验证ISO是否完成; 提示2:变量部分可以独立为var.json文件,在build时单独指定;
  "variables": {
    "iso_url": "[SSD_DATASTORE] 0-ISO/ubuntu-18.04.4-server-amd64.iso",
    "vm-cpu-num": "2",
    "vm-disk-size": "81920",
    "vm-folder": "Templates",
    "vm-mem-size": "4096",
    "vm-name": "Ubuntu1804-T",
    "vm-version": "17",
    "vm-video-ram": "16384",
    "vsphere-cluster": "DC02-Cluster",
    "vsphere-datacenter": "Labs-DC02",
    "vsphere-datastore": "SSD_DATASTORE",
    "vsphere-network": "vlan100",
    "vsphere-password": "VMware1!",
    "vsphere-server": "vcenter.corp.local",
    "vsphere-user": "[email protected]"
}builders段落,用于真正的构建配置,本示例中将经常需要改变的部分通过variables定义,并在此阶段引用。
- vm_name:我们采用variables中的名字和日期进行组合,isotime会获取当前日期;
- notes:显示在虚拟机的备注属性中,用于查看模版具体的构建时间;
- guest_os_type:定义虚拟机客户机操作系统,可以通VMware官方文档或者创建虚拟机后查询.vmx文件获得正确的客户机操作系统代码;
- ssh_username:定义provisioners阶段连接模版虚拟机的口令,此口令来自ks.cfg中的配置;
- disk_controller_type:定义虚拟机的SCSI控制器类型,这里采用更高性能的VMware准虚拟;
- disk_thin_provisioned:定义虚拟机是否使用精简磁盘;
- network_card:网卡类型,这里选择了性能最好的vmxnet3;
- video_ram:显卡显存;
- convert_to_template:定义是否自动转换成模版,请根据需要选择,如果虚拟机部署编排工具不支持从模版克隆,就需要配置为false;
- floppy_files:定义Ubuntu无人值守安装的preseed文件;
  "builders": [
    {
      "CPUs": "{{user `vm-cpu-num`}}",
      "RAM": "{{user `vm-mem-size`}}",
      "RAM_reserve_all": false,
      "boot_command": [
        "<enter><wait><f6><wait><esc><wait>",
        "<bs><bs><bs><bs><bs><bs><bs><bs><bs><bs>",
        "<bs><bs><bs><bs><bs><bs><bs><bs><bs><bs>",
        "<bs><bs><bs><bs><bs><bs><bs><bs><bs><bs>",
        "<bs><bs><bs><bs><bs><bs><bs><bs><bs><bs>",
        "<bs><bs><bs><bs><bs><bs><bs><bs><bs><bs>",
        "<bs><bs><bs><bs><bs><bs><bs><bs><bs><bs>",
        "<bs><bs><bs><bs><bs><bs><bs><bs><bs><bs>",
        "<bs><bs><bs><bs><bs><bs><bs><bs><bs><bs>",
        "<bs><bs><bs>",
        "/install/vmlinuz",
        " initrd=/install/initrd.gz",
        " priority=critical",
        " locale=en_US",
        " interface=eth0",
        " file=/media/preseed.cfg",
        "<enter>"
      ],
      "cluster": "{{user `vsphere-cluster`}}",
      "convert_to_template": "true",
      "datacenter": "{{user `vsphere-datacenter`}}",
      "datastore": "{{user `vsphere-datastore`}}",
      "disk_controller_type": "pvscsi",
      "floppy_files": ["./preseed.cfg"],
      "folder": "{{user `vm-folder`}}",
      "guest_os_type": "ubuntu64Guest",
      "insecure_connection": "true",
      "iso_paths": [
        "{{user `iso_url`}}"
      ],
      "network_adapters": [
        {
          "network": "{{user `vsphere-network`}}",
          "network_card": "vmxnet3"
        }
      ],
      "video_ram": "{{user `vm-video-ram`}}",
      "password": "{{user `vsphere-password`}}",
      "ssh_password": "VMware1!",
      "ssh_username": "root",
      "storage": [
        {
          "disk_size": "{{user `vm-disk-size`}}",
          "disk_thin_provisioned": true
        }
      ],
      "type": "vsphere-iso",
      "username": "{{user `vsphere-user`}}",
      "vcenter_server": "{{user `vsphere-server`}}",
      "vm_name": "{{user `vm-name`}}"
    }
],provissioners段落,用于系统自动化安全完成后的自定义操作,例如:更新系统补丁,清理模版等,本示例中进行了模版清理和主机名配置。
  "provisioners": [
    {
      "type": "shell",
      "inline": [
        "truncate -s 0 /etc/machine-id",
        "rm /var/lib/dbus/machine-id",
        "ln -s /etc/machine-id /var/lib/dbus/machine-id",
        "rm -rf /tmp/* /var/tmp/*",
        "hostnamectl set-hostname {{user `vm-name`}}"
      ]
    }
  ],
preseed.cfg文件说明
preseed文件的介绍很多,这里不进行详细介绍,可以参考官方文档说明,下面仅针对我定制化的内容进行说明;
- 第16行,添加中文支持;
- 第30行和144行,该更更新源;
- 第35-38行,设定root账户密码;
- 第40-50行,添加新用户;
- 第55行,设定亚洲/上海时区;
- 第57行,设定NTP服务器;
- 第61-131行,配置LVM,并基于LVM创建分区;
- 第149行,添加中文支持;
- 第154-164行,添加软件包;
- 第168行,允许Root登录;
- 第169-173行,更改ens192为eth0,禁用IPV6;
本示例中的密码均为VMware1!,请注意自行修改。
### Preseed for Ubuntu 18.04
### Author:Guoqiang Li
# Derived from: https://help.ubuntu.com/lts/installation-guide/example-preseed.txt

### Usage
# We recommend to use the build-iso.sh script to build an image with embedded
# preseed and other required files. In that case the preseed file gets loaded
# automatically and all additional files are available to the installer.

### Unattended Installation
d-i auto-install/enable boolean true
d-i debconf/priority select critical

### Localization
d-i debian-installer/locale string en_US.UTF-8
d-i localechooser/supported-locales multiselect en_US.iso88591, en_US.UTF-8, zh_CN.gb18030, zh_CN.utf8
d-i console-setup/ask_detect boolean false
d-i keyboard-configuration/xkb-keymap select GB

### Network configuration
d-i /choose_interface select auto
# d-i netcfg/hostname string device
d-i netcfg/get_hostname string unassigned-hostname
d-i netcfg/get_domain string unassigned-domain
d-i hw-detect/load_firmware boolean true

### Mirror settings
d-i mirror/country string manual
d-i mirror/http/hostname string cn.archive.ubuntu.com
d-i mirror/http/directory string /ubuntu
d-i mirror/http/proxy string

### Account setup
d-i passwd/root-login boolean true
d-i passwd/root-password password VMware1!
d-i passwd/root-password-again password VMware1!
d-i passwd/make-user boolean false

# The root password is disabled by default.

# Create ops user account.
d-i passwd/user-fullname string ops
d-i passwd/username string ops
d-i passwd/user-password password VMware1!
d-i passwd/user-password-again password VMware1!
d-i user-setup/allow-password-weak boolean true
d-i user-setup/encrypt-home boolean false
d-i passwd/user-default-groups ops sudo
d-i passwd/user-uid string 90

### Clock and time zone setup
d-i clock-setup/utc boolean true
d-i time/zone string Asia/Shanghai
d-i clock-setup/ntp boolean true
d-i clock-setup/ntp-server ntp.ubuntu.com

### Partitioning
d-i preseed/early_command string umount /media || true
d-i partman-auto/method string lvm
d-i partman-auto-lvm/guided_size string max
d-i partman-lvm/device_remove_lvm boolean true
d-i partman-lvm/confirm boolean true
d-i partman-lvm/confirm_nooverwrite boolean true
d-i partman-auto-lvm/new_vg_name string main
d-i partman-md/device_remove_md boolean true
d-i partman-md/confirm boolean true
d-i partman-partitioning/confirm_write_new_label boolean true
d-i partman/choose_partition select finish
d-i partman/confirm boolean true
d-i partman/confirm_nooverwrite boolean true
d-i partman-basicmethods/method_only boolean false

### Partitioning
d-i partman-auto/method string lvm
d-i partman-lvm/device_remove_lvm boolean true
d-i partman-lvm/confirm boolean true
d-i partman-lvm/confirm_nooverwrite boolean true

### EFI
d-i partman-efi/non_efi_system boolean true

### Grub
d-i grub-installer/only_debian boolean true
d-i grub-installer/with_other_os boolean true

### Disk layout
d-i partman-auto-lvm/new_vg_name string vg-root
d-i partman-auto/expert_recipe string                         \
      boot-root ::                                            \
              1 1 1 free method{ biosgrub } .                 \
              500 500 500 ext4                                \
                      $primary{ } $bootable{ }                \
                      method{ format } format{ }              \
                      use_filesystem{ } filesystem{ ext4 }    \
                      mountpoint{ /boot }                     \
              .                                               \
              100% 4096 100% linux-swap                       \
                      lv_name{ swap }                         \
                      method{ swap } format{ }                \
                      $lvmok{ }                               \
              .                                               \
              4096 4096 4096 xfs                              \
                      lv_name{ log }                          \
                      method{ lvm } format{ }                 \
                      use_filesystem{ } filesystem{ xfs }     \
                      mountpoint{ /var/log }                  \
                      $lvmok{ }                               \
              .                                               \
              20480 20480 20480 xfs                           \
                      lv_name{ root }                         \
                      method{ lvm } format{ }                 \
                      use_filesystem{ } filesystem{ xfs }     \
                      mountpoint{ / }                         \
                      $lvmok{ }                               \
              .                                               \
              1024 1024 -1 xfs                                \
                      lv_name{ app-data }                     \
                      method{ lvm } format{ }                 \
                      use_filesystem{ } filesystem{ xfs }     \
                      mountpoint{ /app-data }                 \
                      $lvmok{ }                               \
              .
# Write and configure LVM
d-i partman-lvm/confirm boolean true
d-i partman-lvm/confirm_nooverwrite boolean true
d-i partman/choose_partition select finish
d-i partman/confirm_write_new_label boolean true
d-i partman-auto-lvm/guided_size string max

### Base system installation
d-i base-installer/install-recommends boolean true
d-i base-installer/kernel/image string linux-generic
d-i debconf debconf/frontend select Noninteractive

### Apt setup
d-i apt-setup/restricted boolean true
d-i apt-setup/universe boolean true
d-i apt-setup/backports boolean true
d-i apt-setup/use_mirror boolean false
d-i apt-setup/services-select multiselect security, updates
d-i apt-setup/security_host string cn.security.ubuntu.com
d-i apt-setup/security_path string /ubuntu

### Package selection
d-i tasksel/first multiselect none
d-i pkgsel/language-packs multiselect en, zh
d-i pkgsel/upgrade select full-upgrade
d-i pkgsel/update-policy select unattended-upgrades

# Individual additional packages to install
d-i pkgsel/include string openssh-server \
    vim \
    git \
    tmux \
    build-essential \
    open-vm-tools \
    telnet \
    wget \
    curl \
    python \
    net-tools

### Finishing up the installation
d-i preseed/late_command string \
in-target sed -i 's/#PermitRootLogin .*/PermitRootLogin yes/' /etc/ssh/sshd_config; \
in-target sed -ie 's/GRUB_CMDLINE_LINUX="\(.*\)"/GRUB_CMDLINE_LINUX="quiet net.ifnames=0 biosdevname=0 ipv6.disable=1\1"/g' /etc/default/grub; \
in-target grub-mkconfig -o /boot/grub/grub.cfg; \
in-target sed -i "s/dhcp6: yes/dhcp6: no/g" /etc/netplan/01-netcfg.yaml; \
in-target sed -i "s/ens192/eth0/g" /etc/netplan/01-netcfg.yaml; \
in-target update-grub
d-i debian-installer/splash boolean false
d-i cdrom-detect/eject boolean true

### Reboot or Shutdown machine
d-i finish-install/reboot_in_progress note
#d-i debian-installer/exit/poweroff boolean true
Packer验证配置
完成配置文件的准备后,我们需要验证packer的配置文件是否正确,使用以下命令:
packer validate ubuntu-vsphere.jsonPacker执行构建
packer build ubuntu-vsphere.json如果第一次构建成功,并且虚拟机名称是固定的(本示例是基于日期的)下一次构建时可以增加-force参数覆盖上一次模版;
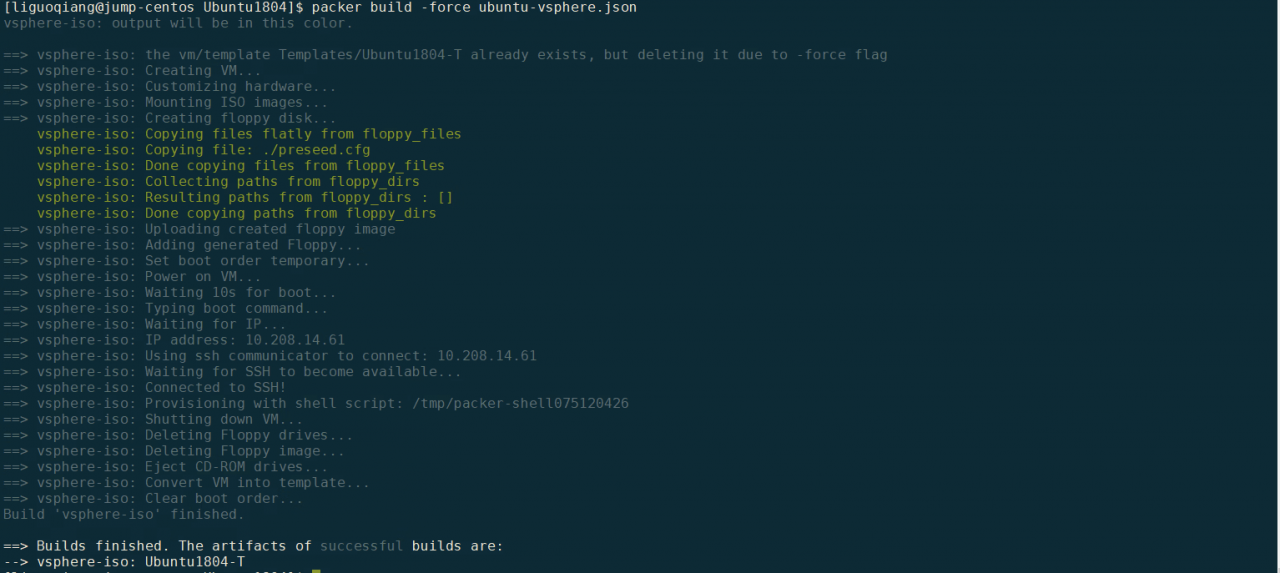
packer build -froce ubuntu-vsphere.json检查构建结果
构建完成后,命令行如下提示;
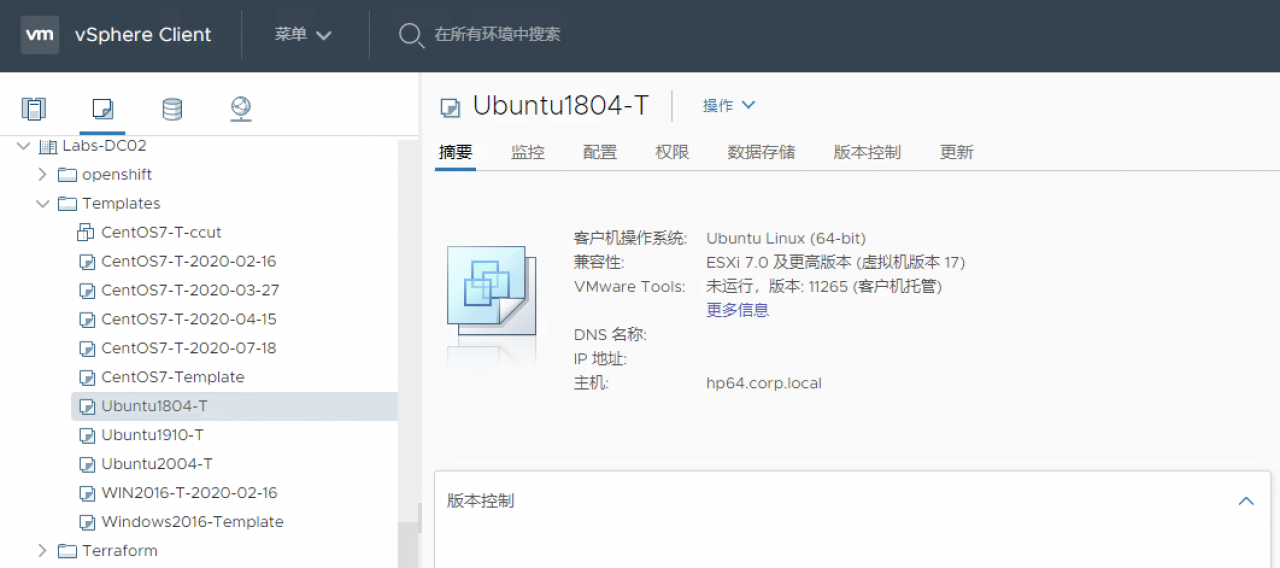
登陆到vSpehre中可以看到模版:
完成
至此我们通过Packer实现了vSphere环境下Ubuntu多个版本的虚拟机模版的创建,Debian系统和Ubuntu的构建方法相同,您可以自己尝试制作一个。